Background
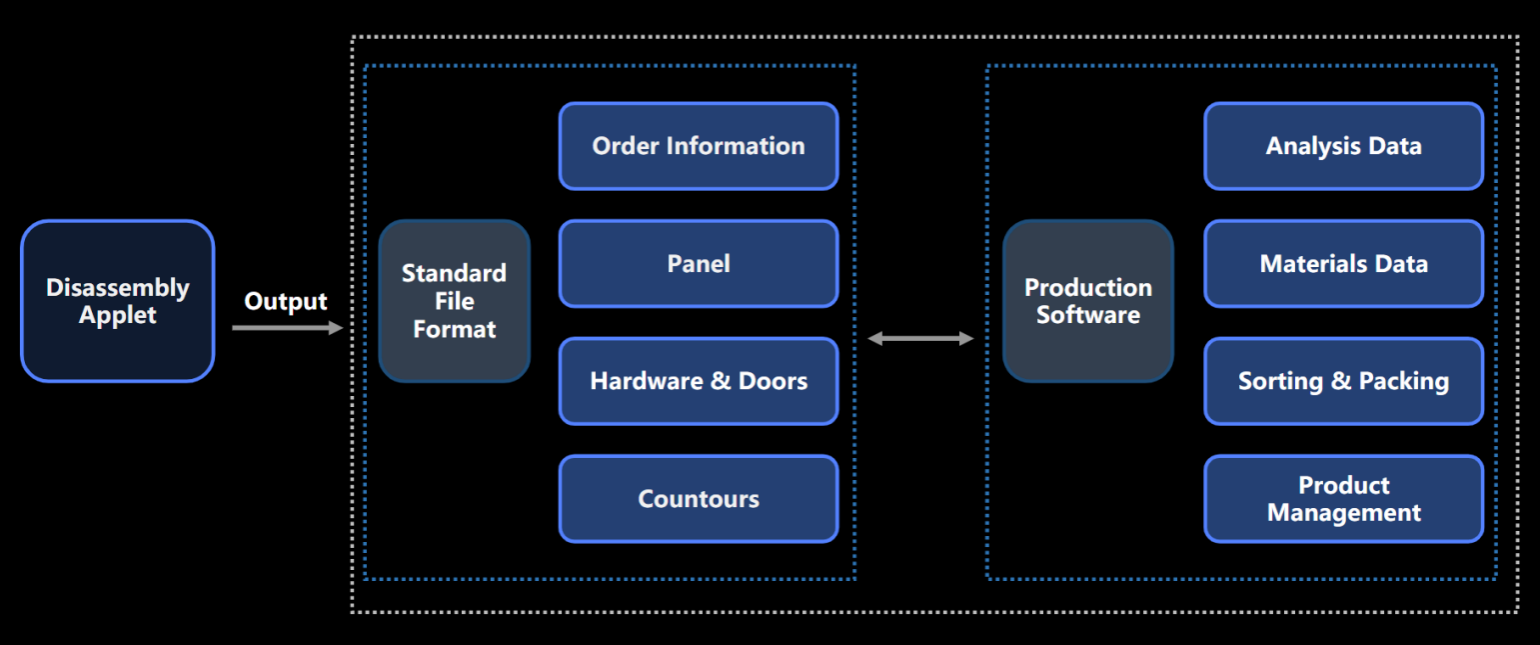
As an international version of splitting orders, the core ability of this version is to disassembly and output standard format files in ".json" that can be used internationally. It can fully output all categories of furniture products, including (order information, panel data, finished product data, molding data) series of products according to industry standards and the product's own usage attributes into a standard format data. This data includes panel holes, panel outmoldings, finished product categories, finished product hardware products, which can be directly called and converted by the backend production system.
The following content introduces the process from creating a plan → submitting an order→ disassembly the order→completing the order splitting, as well as introducing the Review capability and adjustment of craftsmanship in the order disassembly process. Detailed information will be presented below.
Sections
Main Content
Order splitting process
Create a customized submission form after completing the design plan.
ICore Review capabilities
Explanation of the abilities related to Reviewing in order splitting.
Craft adjustment
Explanation of the abilities to adjust panel crafting in order splitting.
Subsequent data processing
Introducing the ways to process subsequent data after order splitting is completed.
Other Information
Other information and help.
Order splitting process
1.1 Create a new plan
Role: Designer
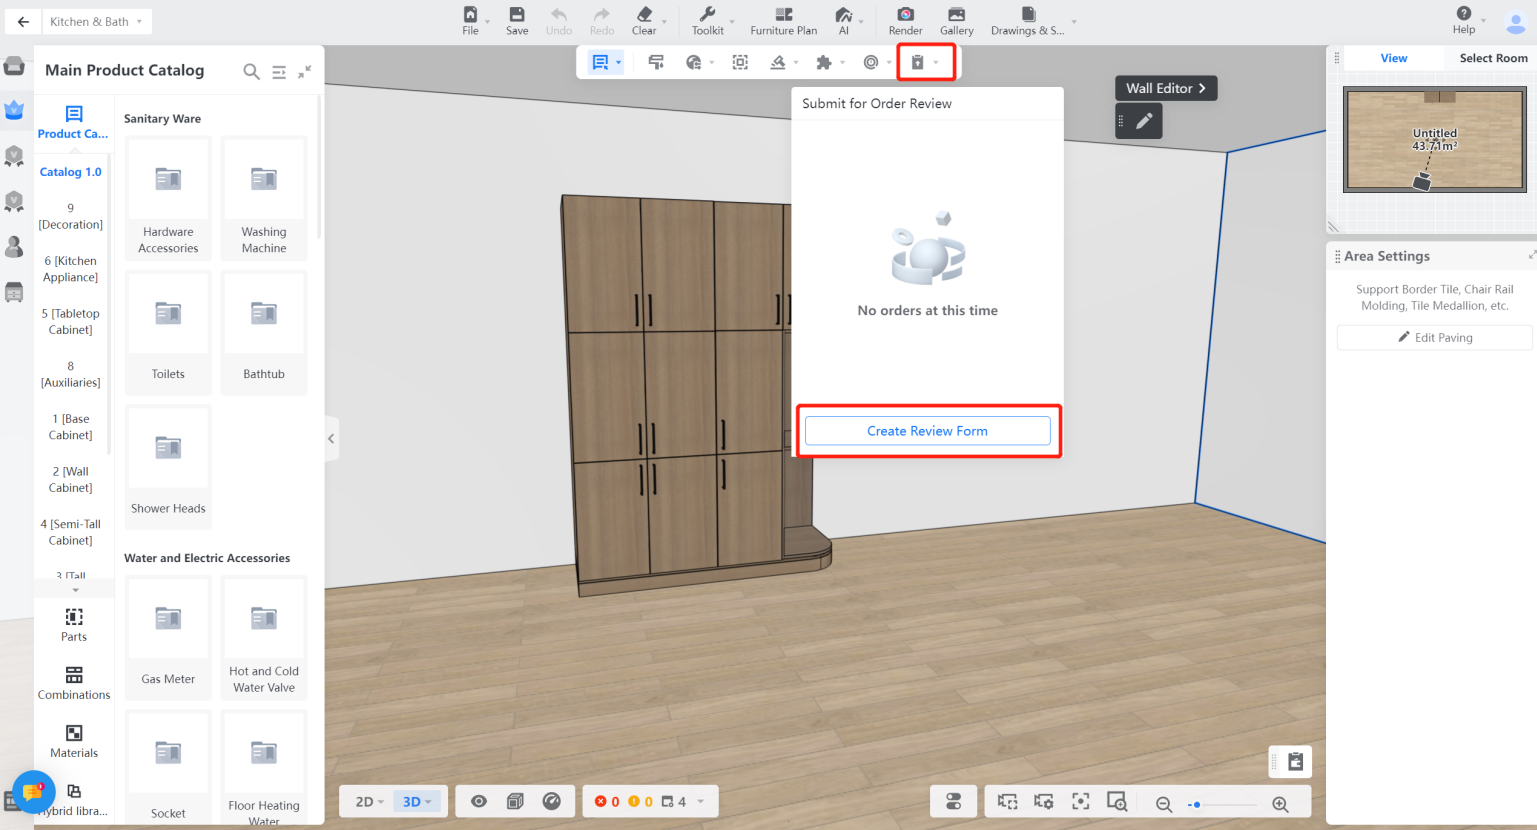
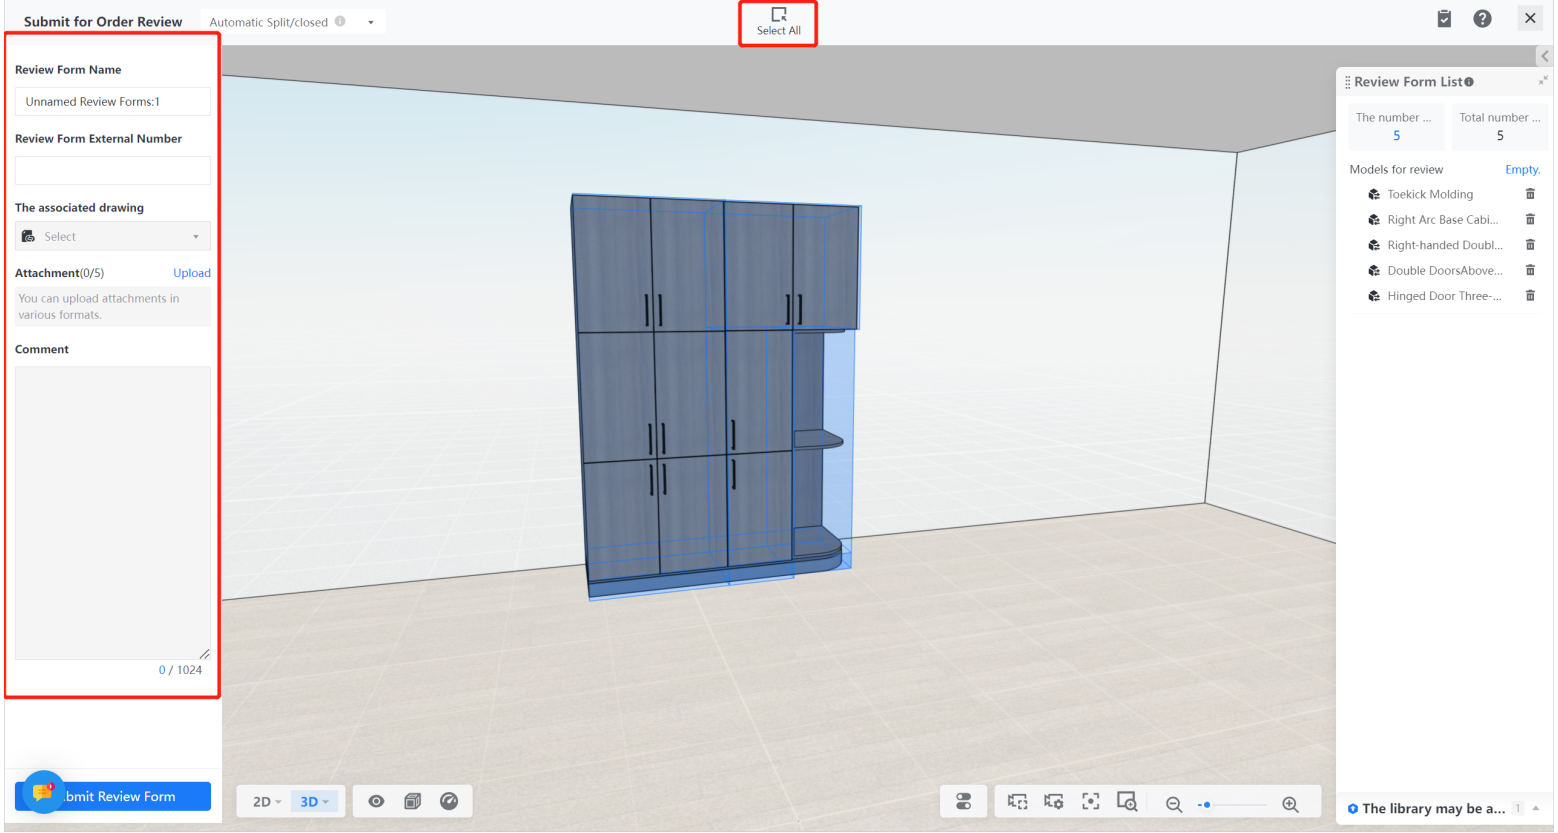
After completing the design plan, the designer needs to create a submission form for the design plan. Click "Order Submission" -> Select "New Review Form".
② Select the cabinets that need to be submitted for review, edit the "Review Form Information," and click "Submit for Review."
In the popup interface, select the corresponding cabinet, fill in the Review information, and then submit it.
1.2 Create an order
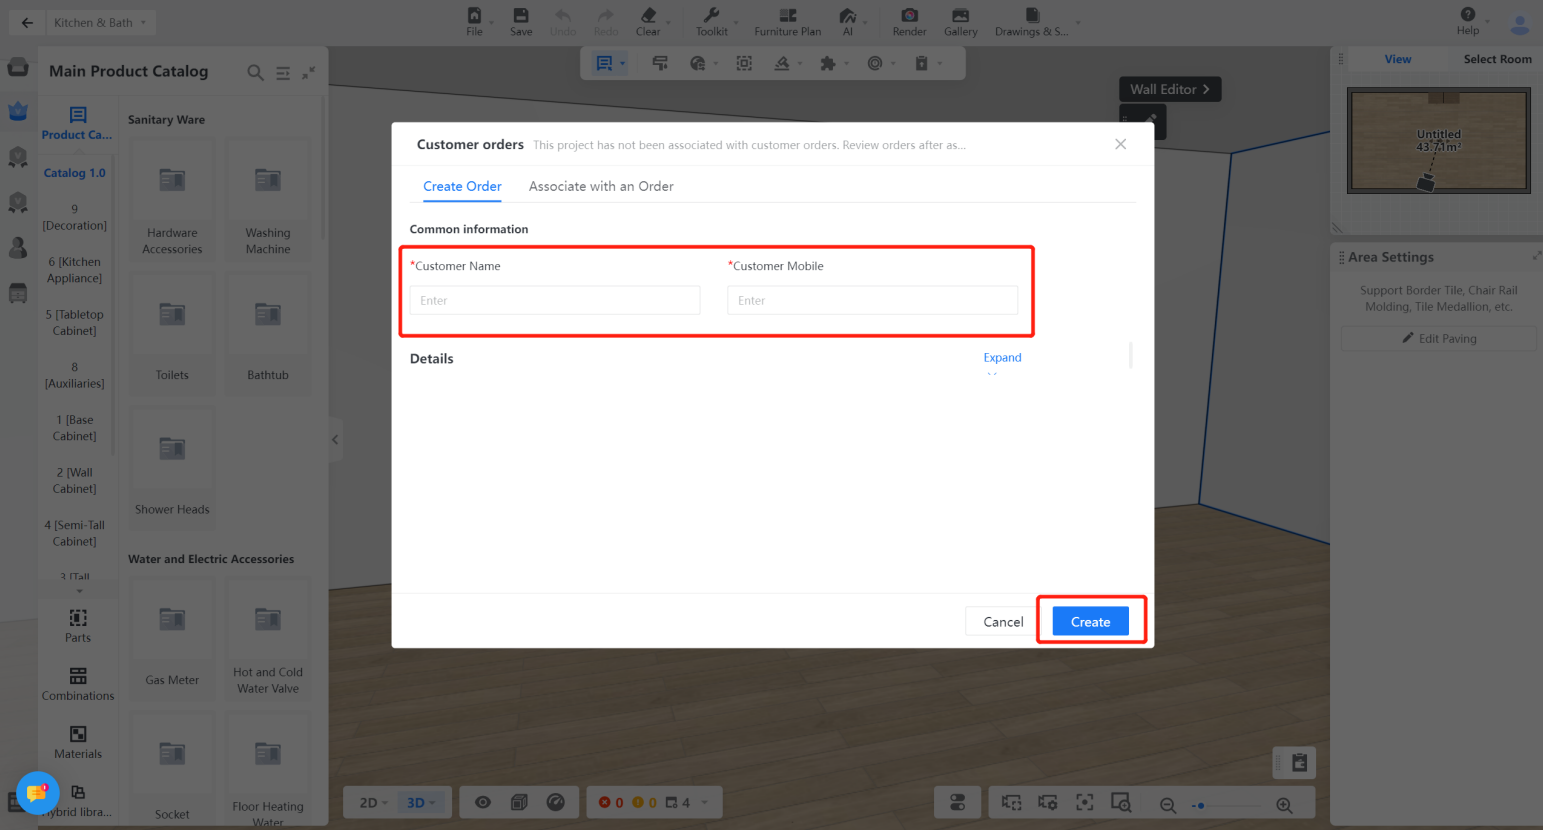
1.2.1 Fill in customer information
① Fill in the "Customer Information" on the pop-up page and click "Create".
② Select the cabinets that need to be submitted for review, edit the "Review Form Information," and click "Submit for Review."
③ Confirm and “Submit”
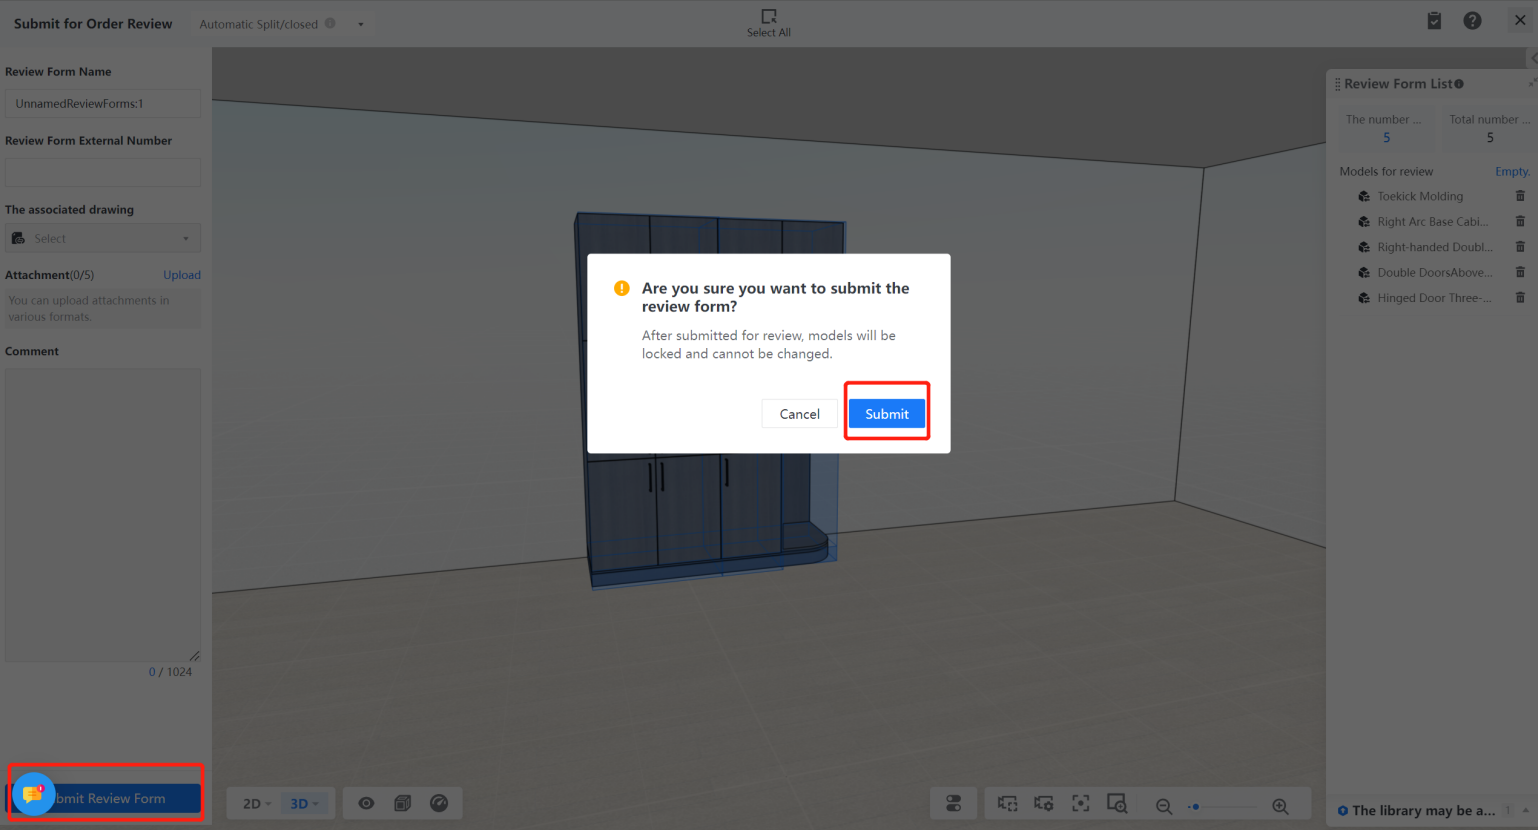
☆ The Review form is created.
Note: The above is the method of creating a customized Review form. Next, you need to enter the corresponding reviewer's account and access the "Customized Review Form Capability" in the backend.
1.3 Customized Review Form
1.3.1 Enter the Customized Review Form
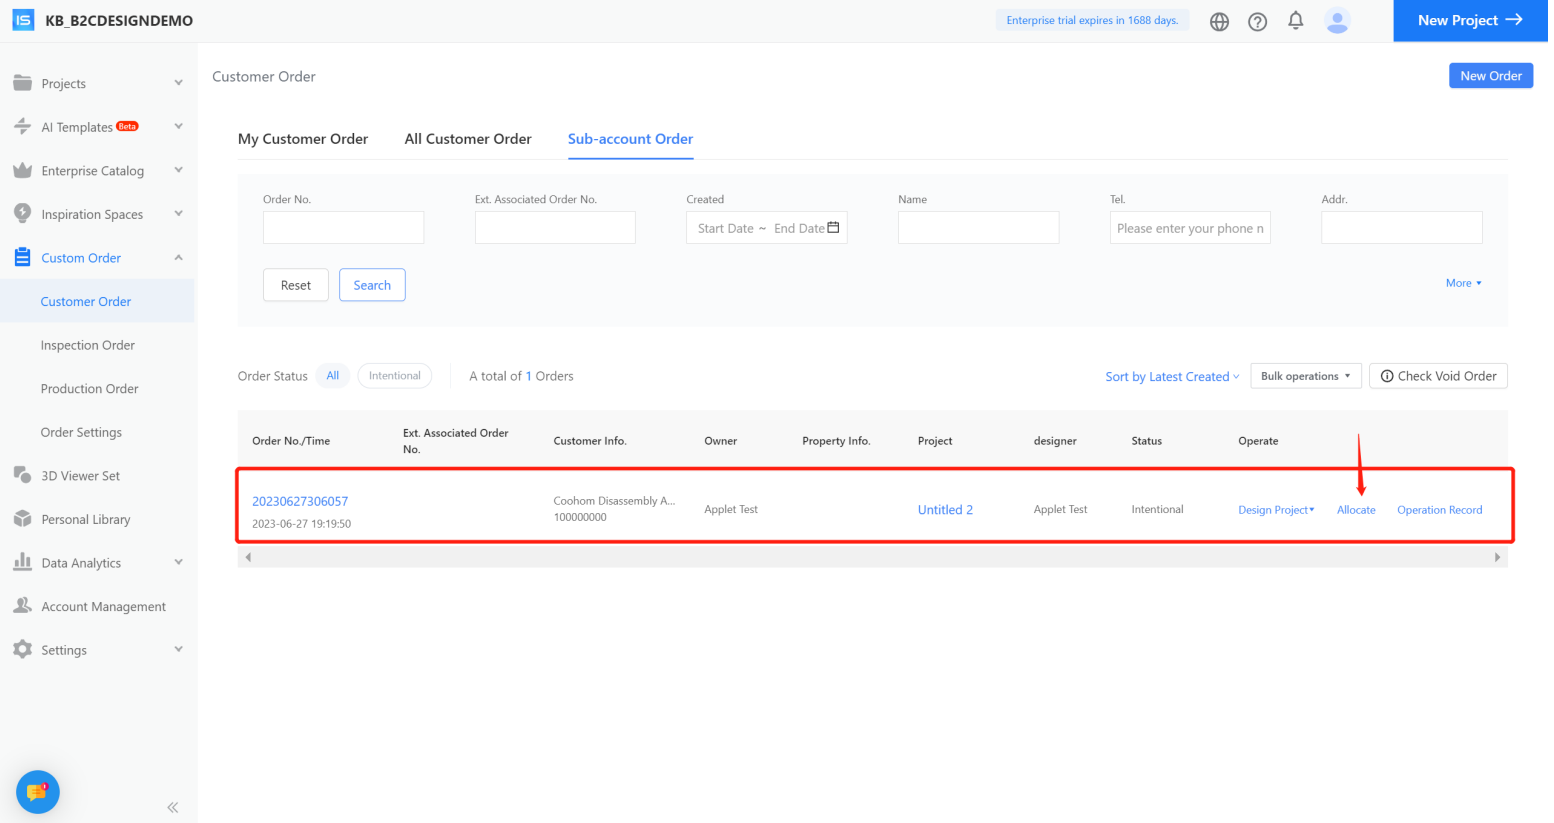
① Enter the customized Review form backstage.

② After finding the corresponding Review form, based on the actual enterprise situation, determine whether it needs to be assigned or claimed.
1.3.2 Enter the Order-splitting Assistant
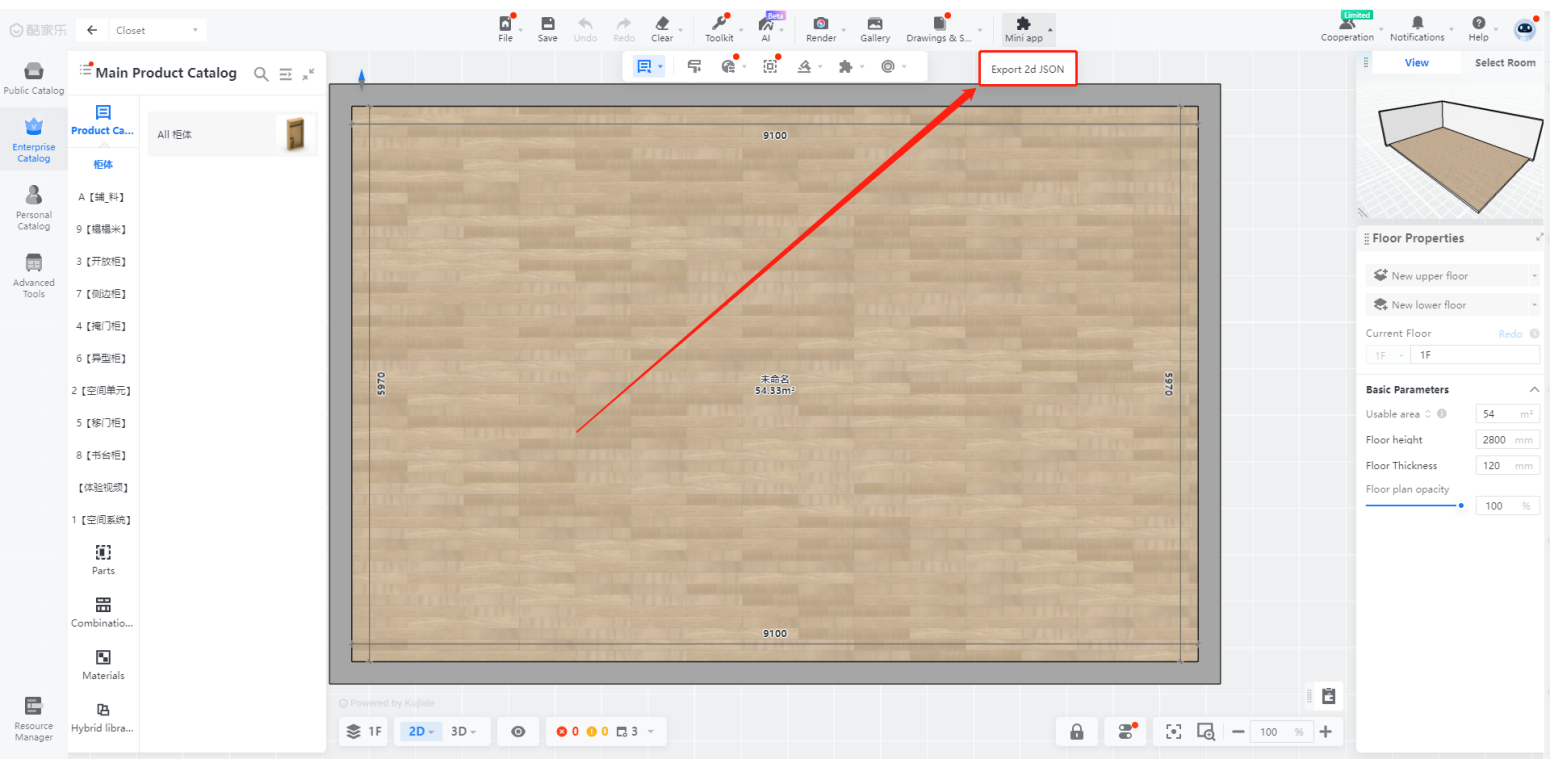
After entering the Review plan, (if the plan has been Reviewed and no problems are found,) click "applet" in the top toolbar and enter the applet.
1.3.3 Prepare for review
③ Click and starts the order disassembly process officially.
1.3.4 Fill in the production order information
After entering the order-splitting process, we need to add order information. Click "Order Information" -> Edit "Order Information Content" -> Click "Submit."
After completing the order information filling, the next step is to proceed with the cabinet technology review.
1.4 Disassembly and Approval
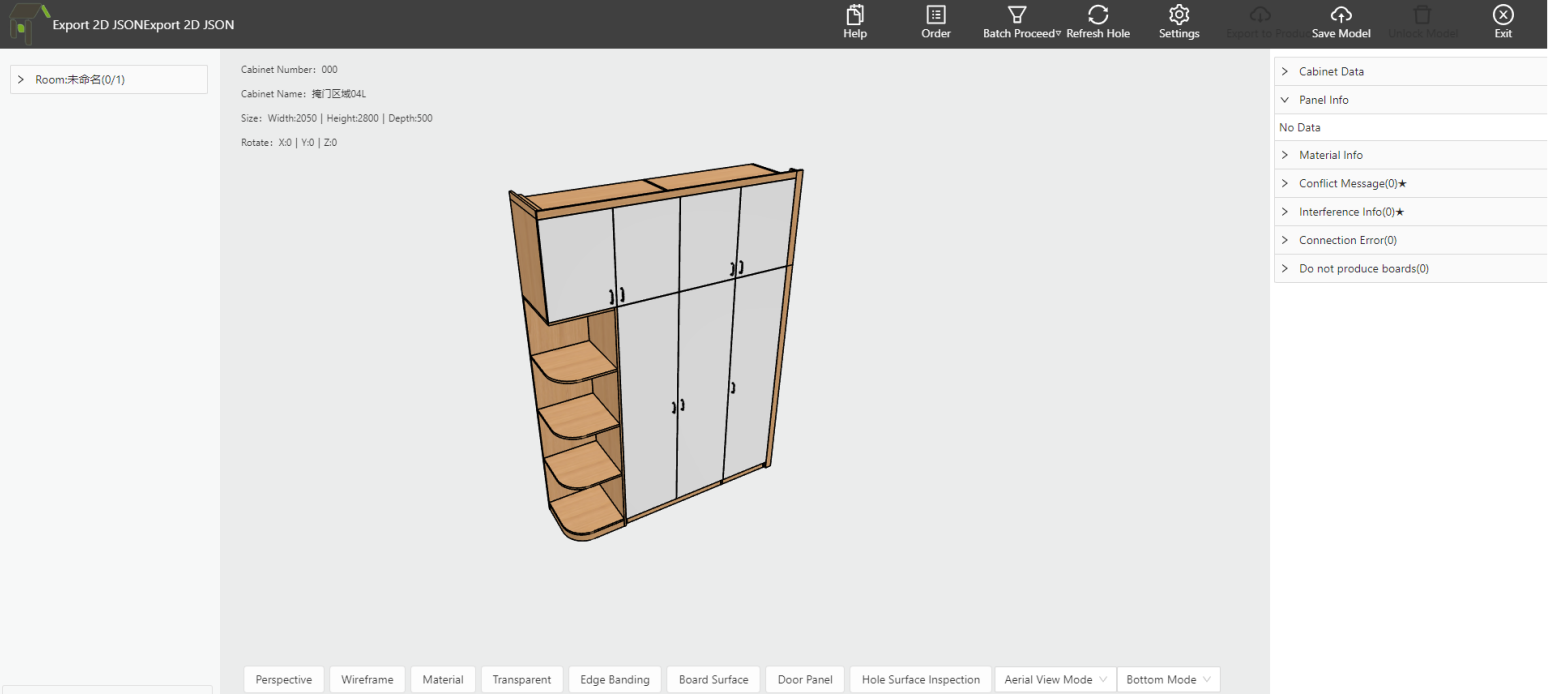
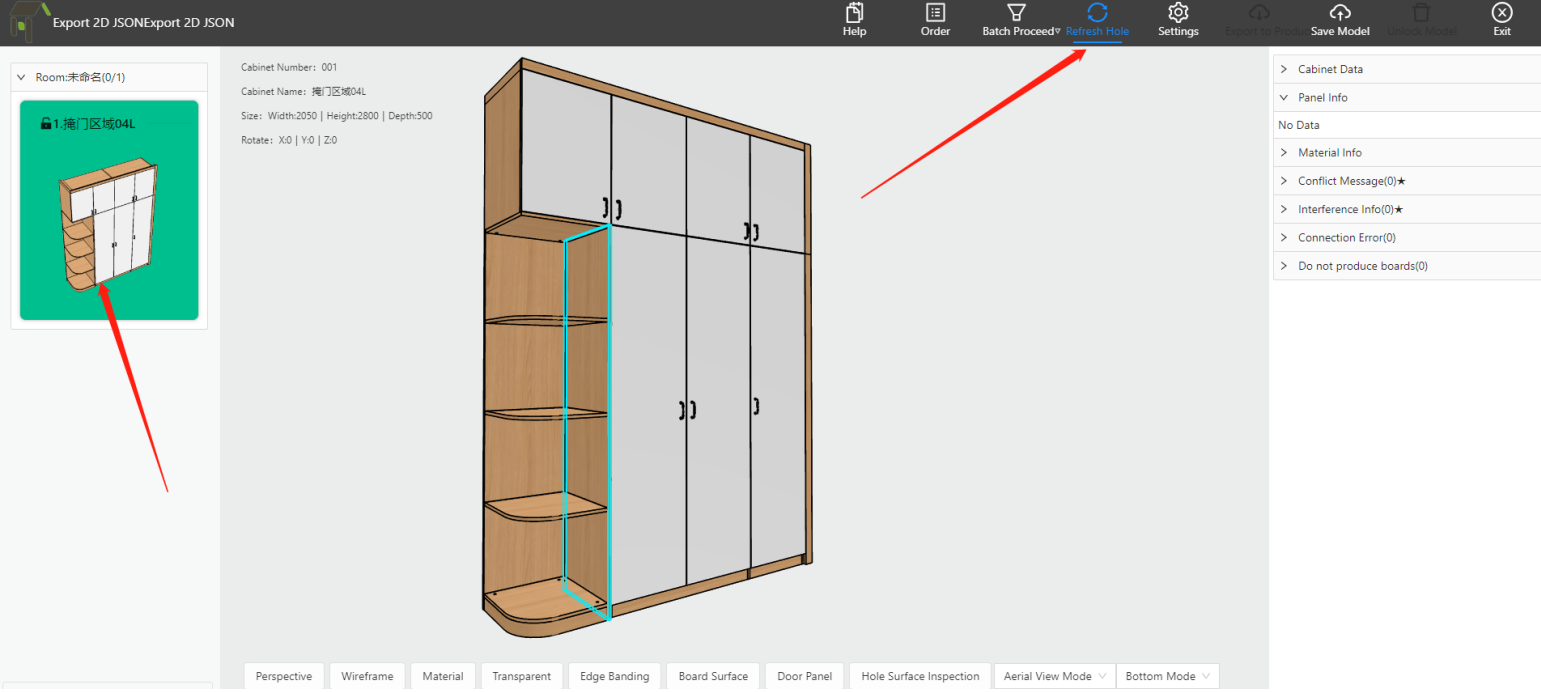
1.4.1 Generate slots
There are two ways to generate slots:
① Select the cabinet in the left column and click "Refresh Slots"
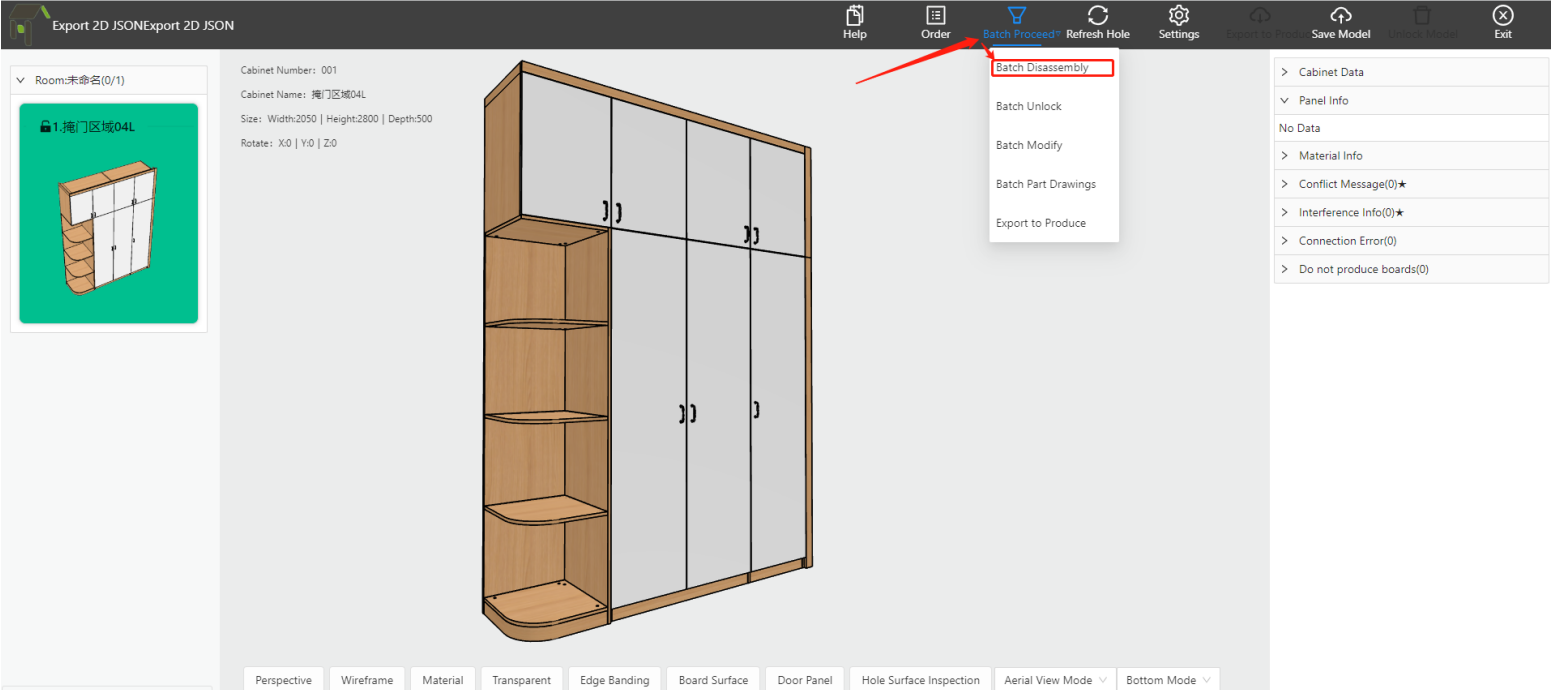
② Click "Batch Proceed" -> Select "Batch Disassembly"
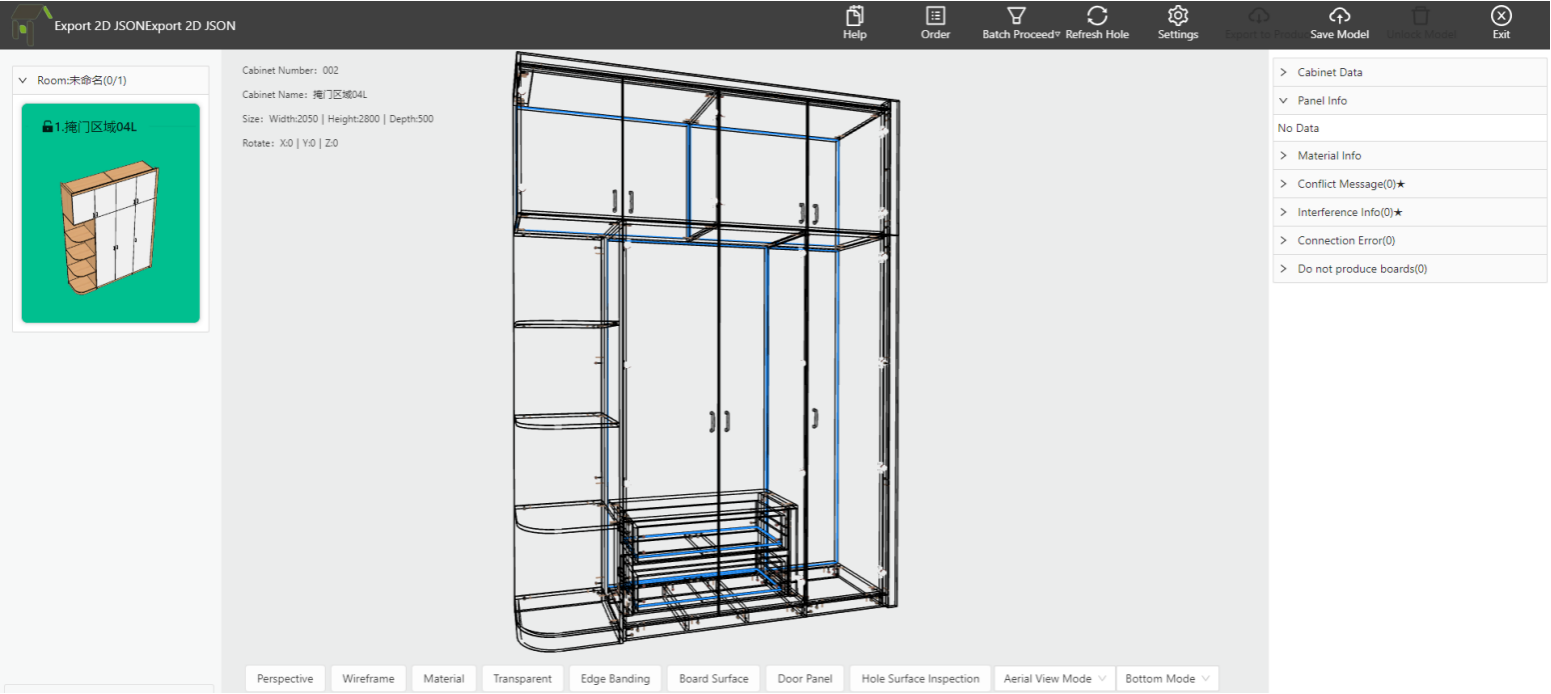
1.4.2 Slot Review
We complete the review and adjustment of all cabinets on this page:
-
Slot Review
-
Edge Banding Review
-
Interference Check
-
Etc.
Slot Review
Edge Banding Review
Interference Check
Etc.
After the cabinet completes the disassembly and approval conditions, it needs to be saved.
1.5 Data Saving
1.5.1 Complete the Disassembly
After the cabinet passes the disassembly and has no problems, click "Save Model."
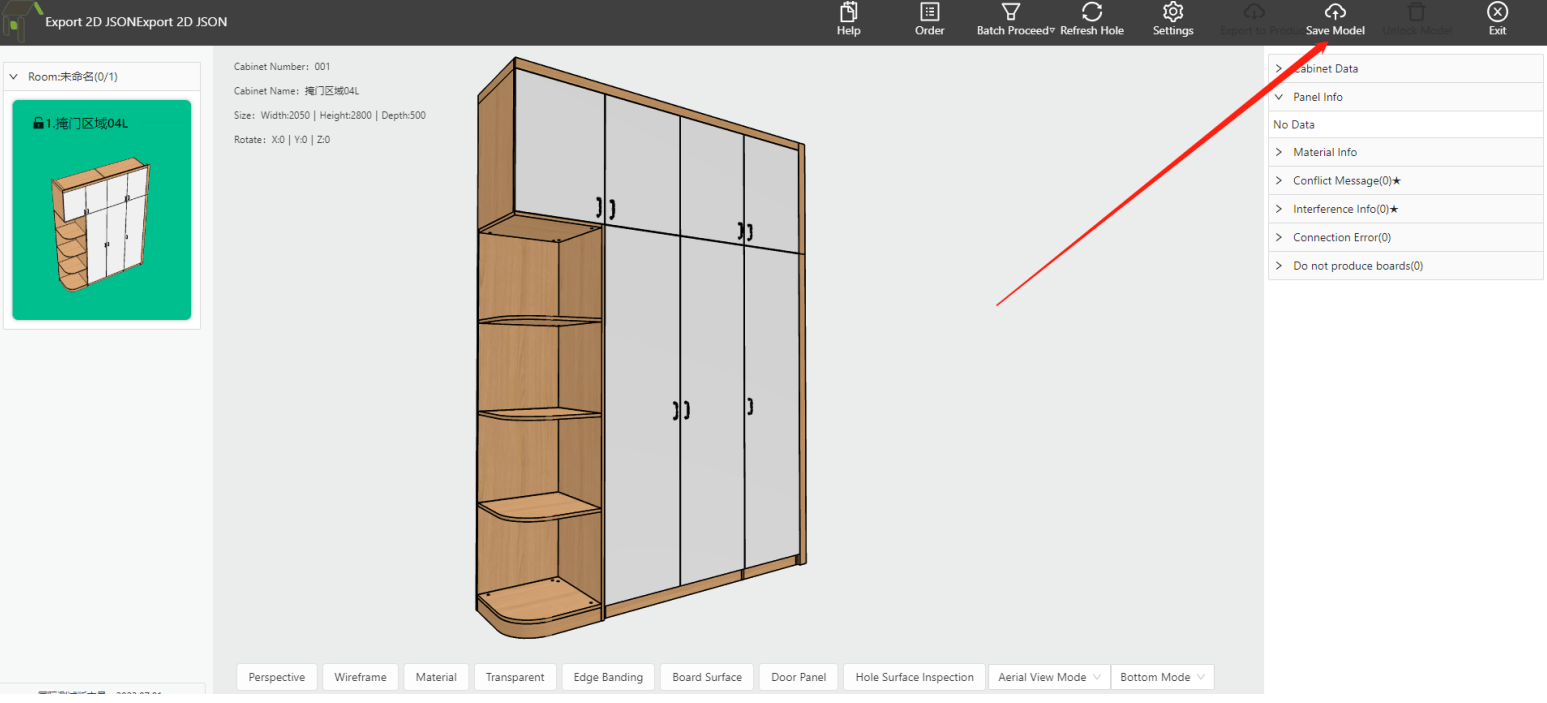
1.5.2 Save Prompt
After clicking "Save Model," the system will perform one last process check. There are two possible results:
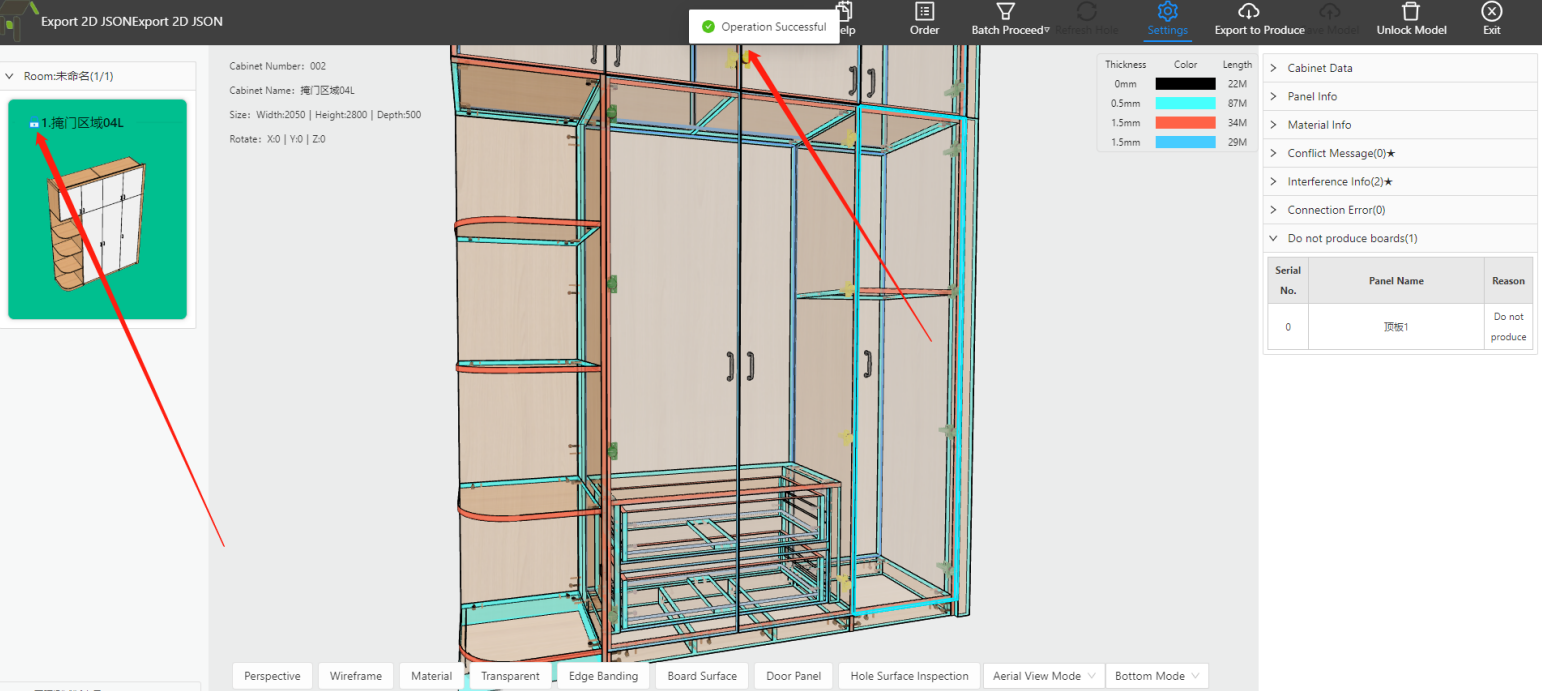
① The save was successful, indicating that there were no process errors with the current cabinet.
② There were process errors, and the system prompts "Cancel" or "Ignore and Save." In this case, the disassembler needs to determine whether to cancel or ignore based on the actual error situation.

1.6 Export Data
When all the cabinets in the plan have completed disassembly and approval, click "Model Production" or click "Batch Production" in the batch processing section. At this time, the order assistant will produce a standard product and json format file carrying product process attributes.

Model Production: Represents the production-related data information generated by the current cabinet only.
Batch Production: Represents the ability to choose all cabinets that have been disassembled and approved under the current order and merge them to generate production-relevant information.
Note: The above is an overview of the roughly process from order creation to disassembly completion. The following is an explanation of the software's operational capabilities.
Review Core Competencies
2.1 Display Method
Note: After the internal structure of the cabinet is reviewed in the front-end tool, if necessary, it can also be reviewed in the mini-program. We can use the "Transparency" button or the "Door Panel" button to view the internal structure of the cabinet by perspective or hiding the door panels.
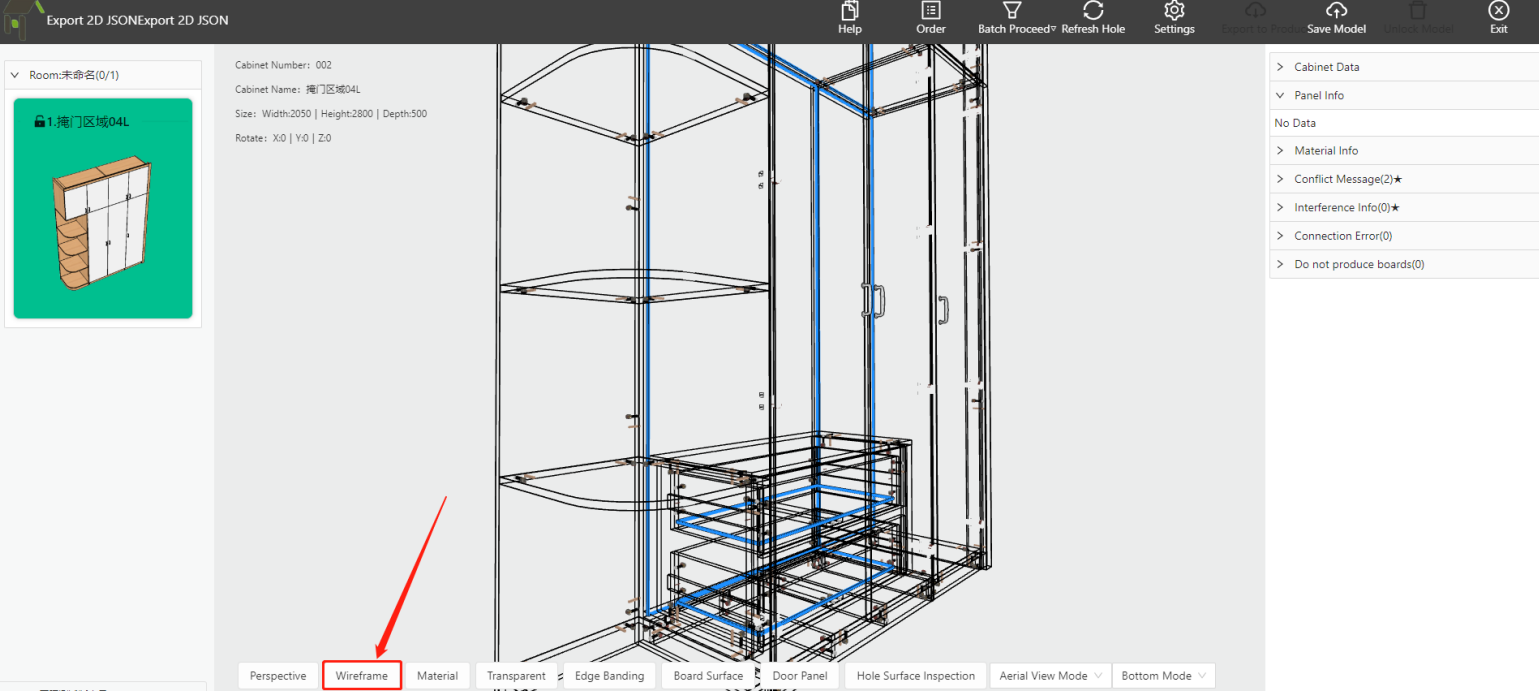
The current system supports roughly three display methods:
① Wireframe Transparency
Click "Wireframe," and all cabinet panels are displayed in a pure transparent state.
② Material Transparency
Click "Transparency," and all cabinet panels are displayed in a semi-transparent state with their materials visible.
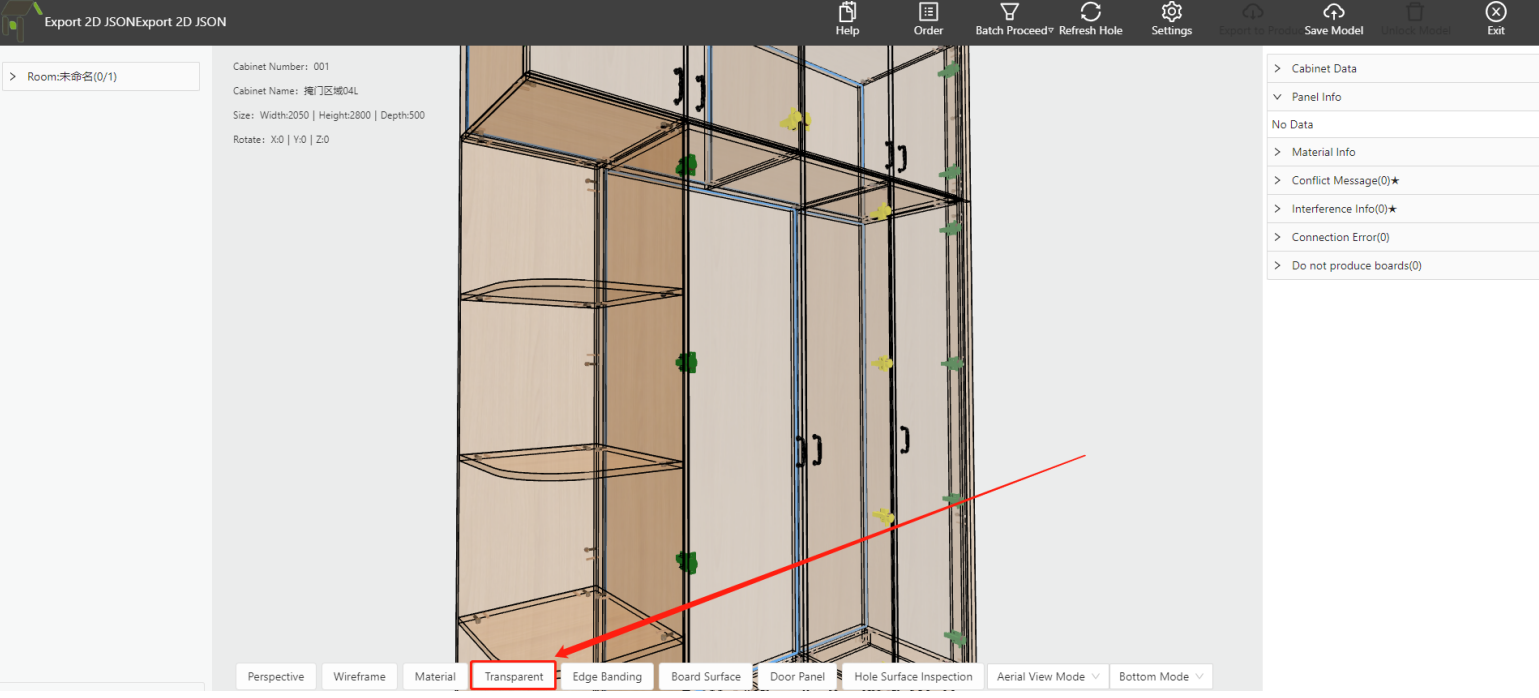
③ Door Panel Hiding
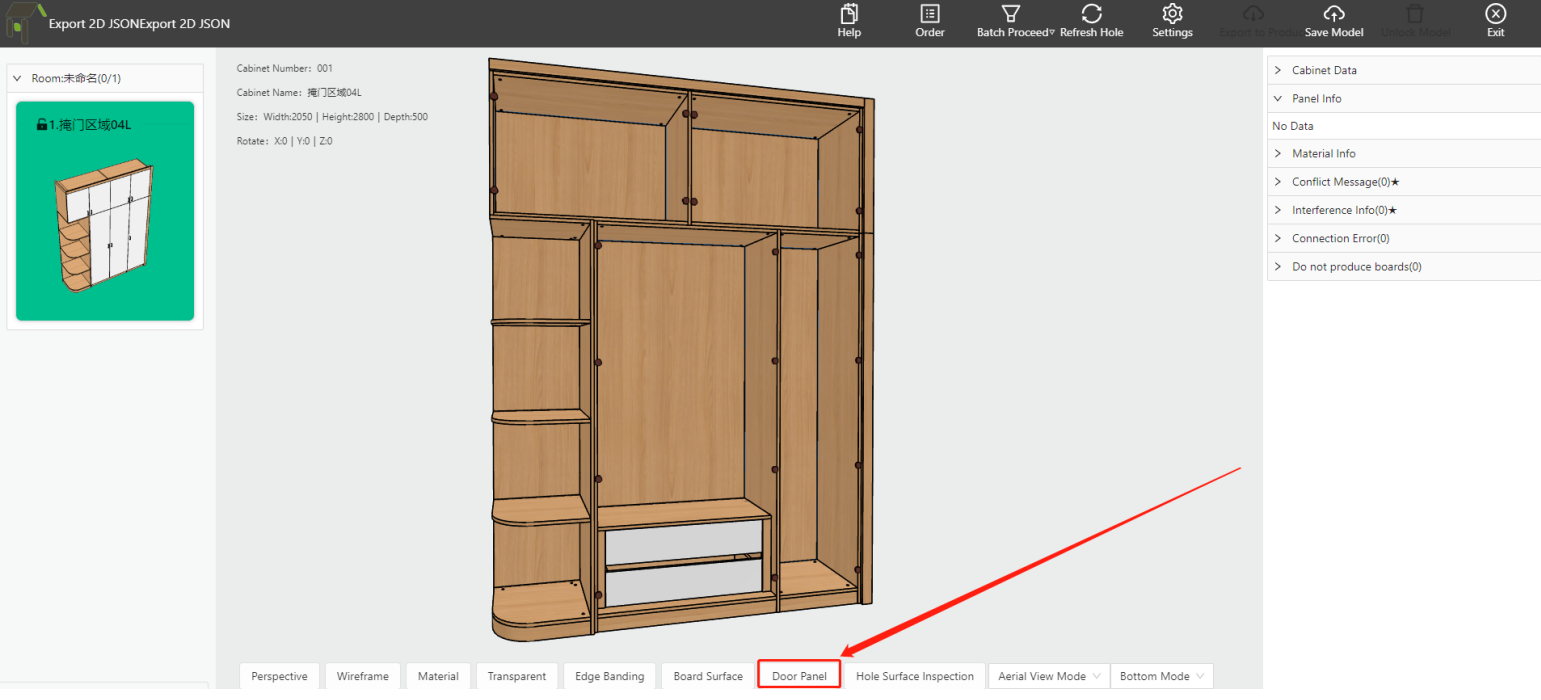
Note:
① If there is a conflict between the door hinge and the layer panel as shown in the figure, modifications can be made based on the hardware check content below.
② If any modification issues are found in the mini-program or raised by the designer, they can be processed through the normal order review and rejection process.
2.2 Edge Banding Review
① Click "Edge Banding," and the edges of all panels are displayed in their corresponding colors.

② In the upper-right corner of the canvas, various demonstrations show the actual thickness of the edge banding. The disassembler reviews whether the edge banding is correct based on this display.
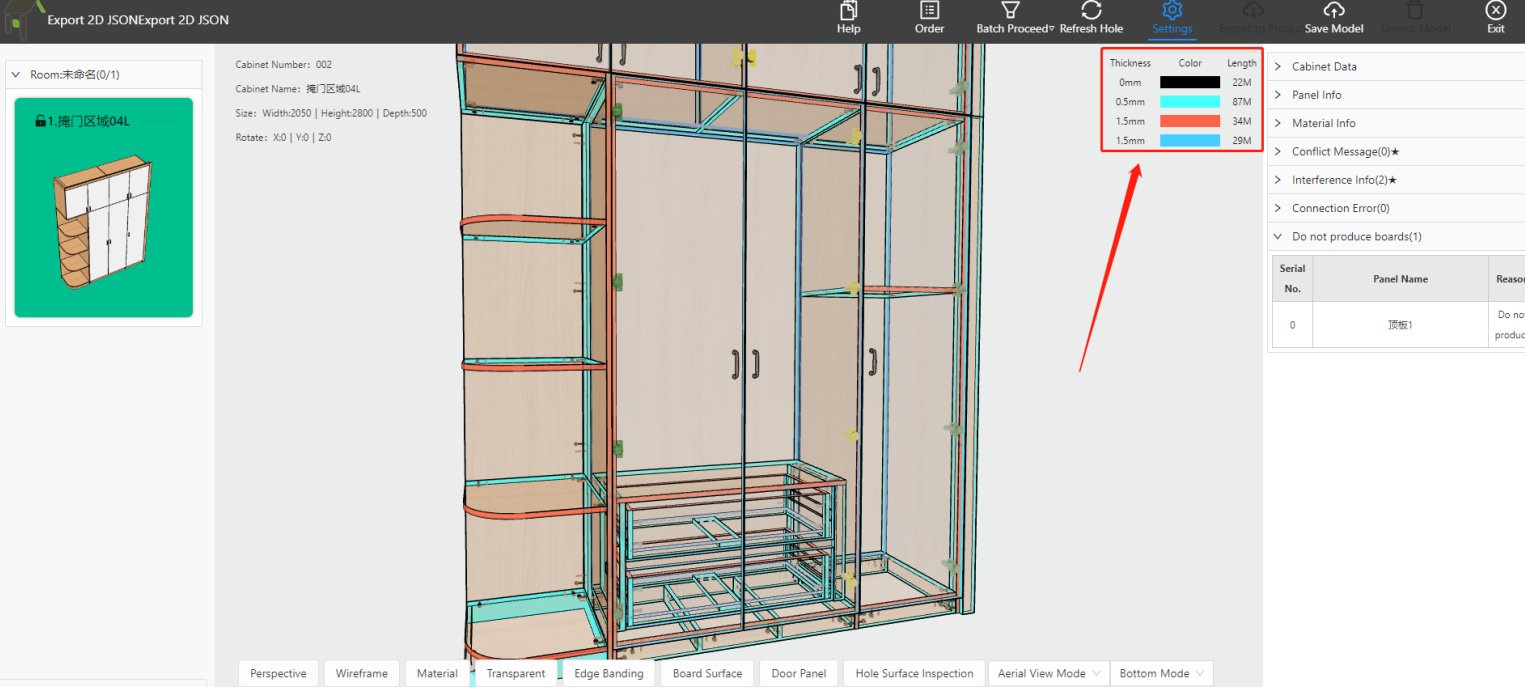
Note: If a problem is found with the edge banding of a panel, modify it based on section 3.1.2.
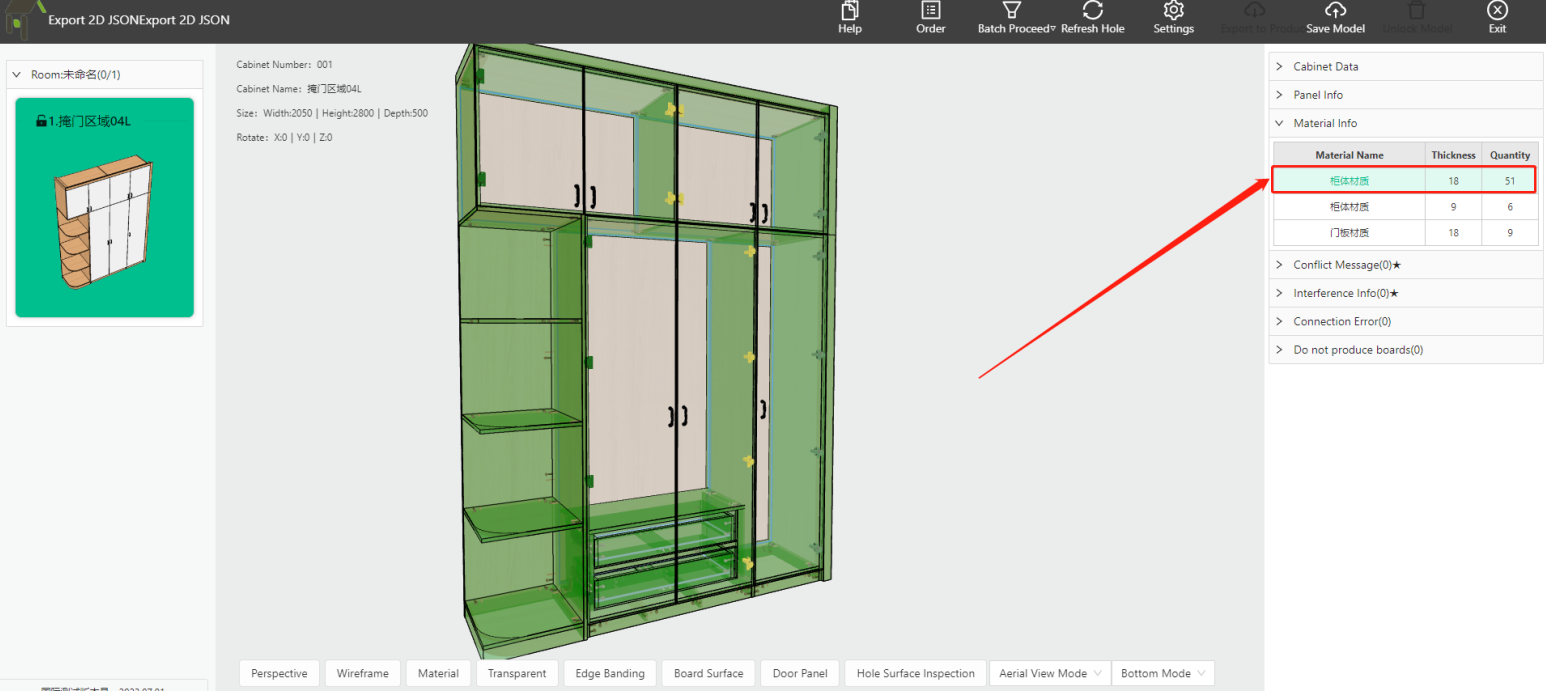
2.3 Material Review
Note: Each order will have 1-3 material colors, and some even have 5~10 colors. For complex cases, there may be more. In this situation, we can review the materials by clicking on the cabinet information in the material section on the right sidebar of the Order Assistant and matching it with the cabinet display on the canvas.
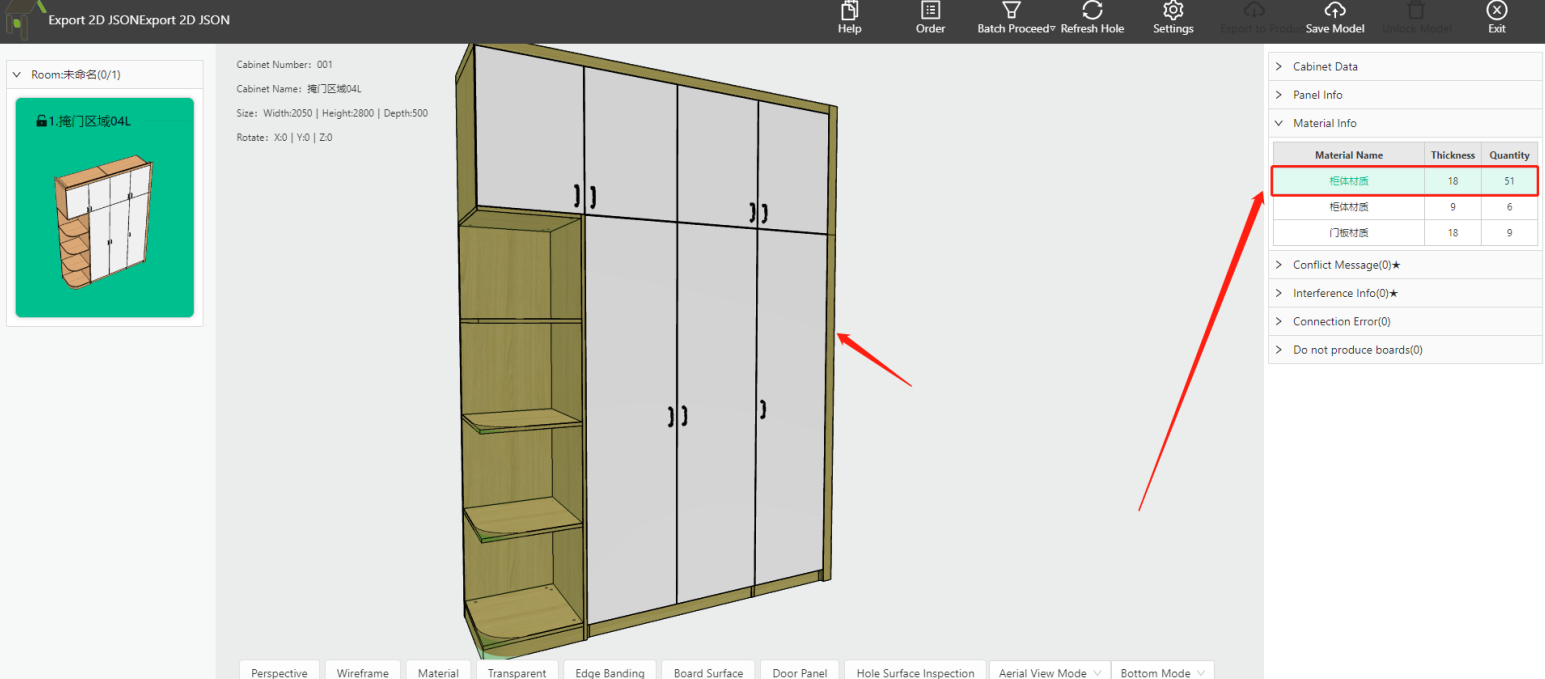
① Select the cabinets that need to be reviewed for materials.
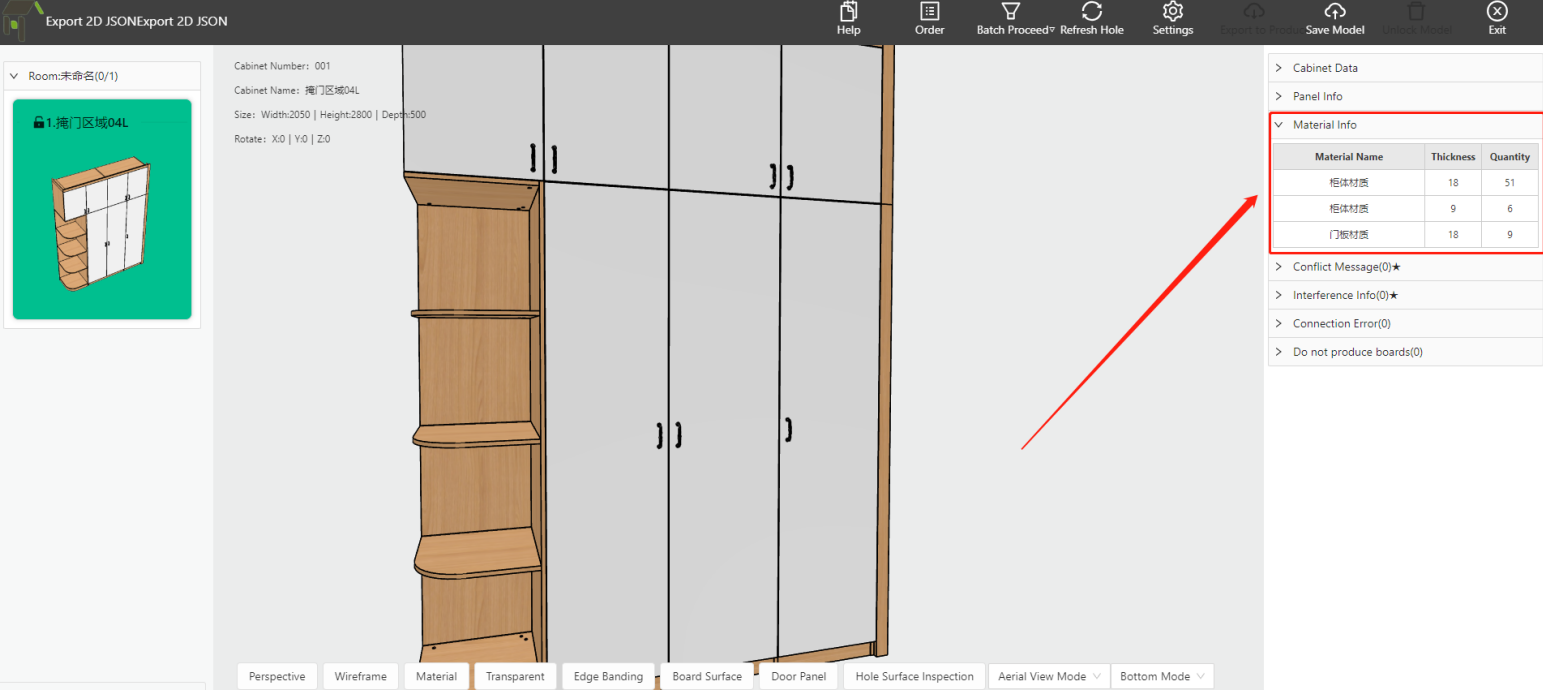
② Click on the material color on the right sidebar.
Note: The material will be highlighted on the canvas.
③ Can also use the transparent button to view the material.
2.4 Combination Cabinet Review
The structure of each cabinet in the industry is different, some are large and some are small. When splitting orders, to facilitate the review of larger cabinets, such as combination cabinets in the design scheme, the system can expand the individual sub-unit cabinets for independent review. The detailed steps are as follows:
① Select the cabinet on the left sidebar and click on 【Cabinet Data】 on the right sidebar.

② In the expanded list, select the corresponding sub-unit cabinet. The corresponding unit cabinet will be displayed independently, and then continue to complete the review action.
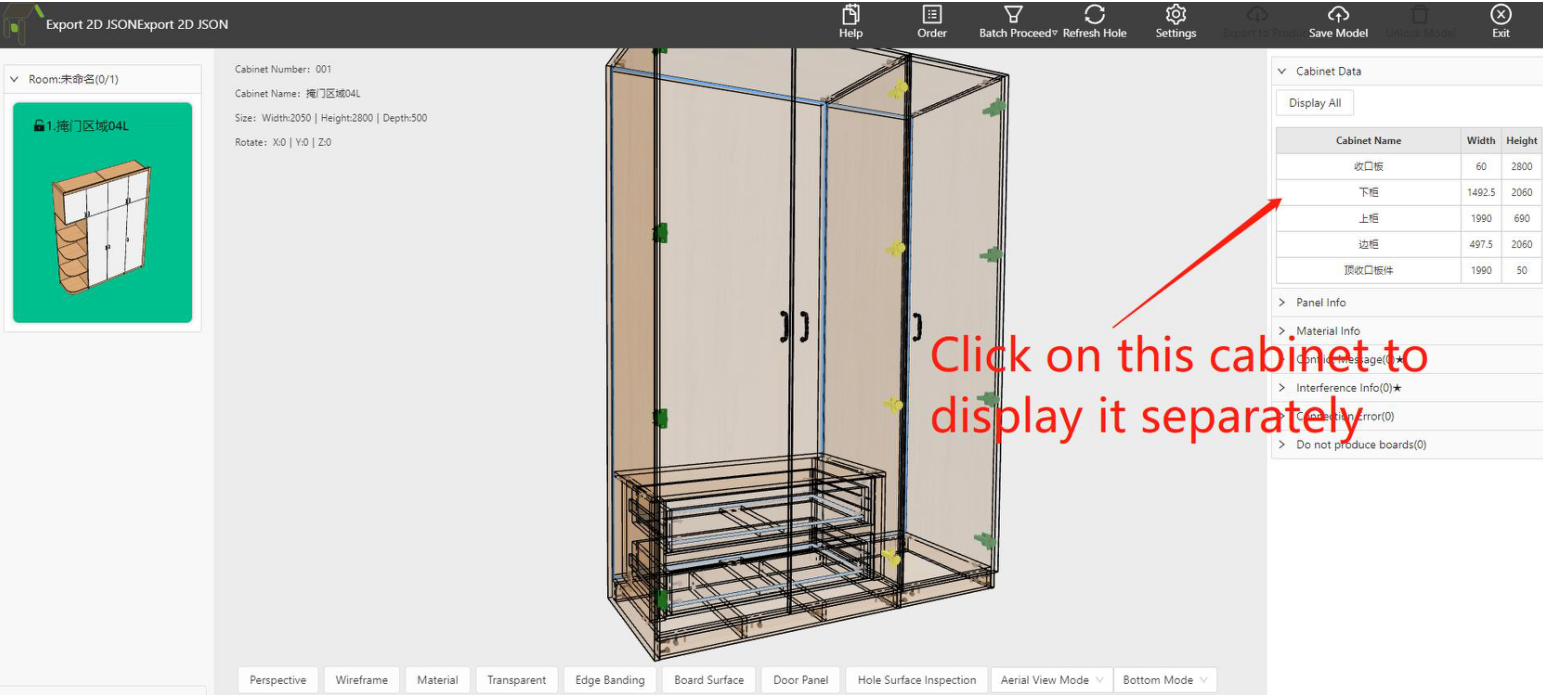
③ After completing the review of all sub-unit cabinets, click on 【Show All Cabinets】 to return to the display of all cabinets.

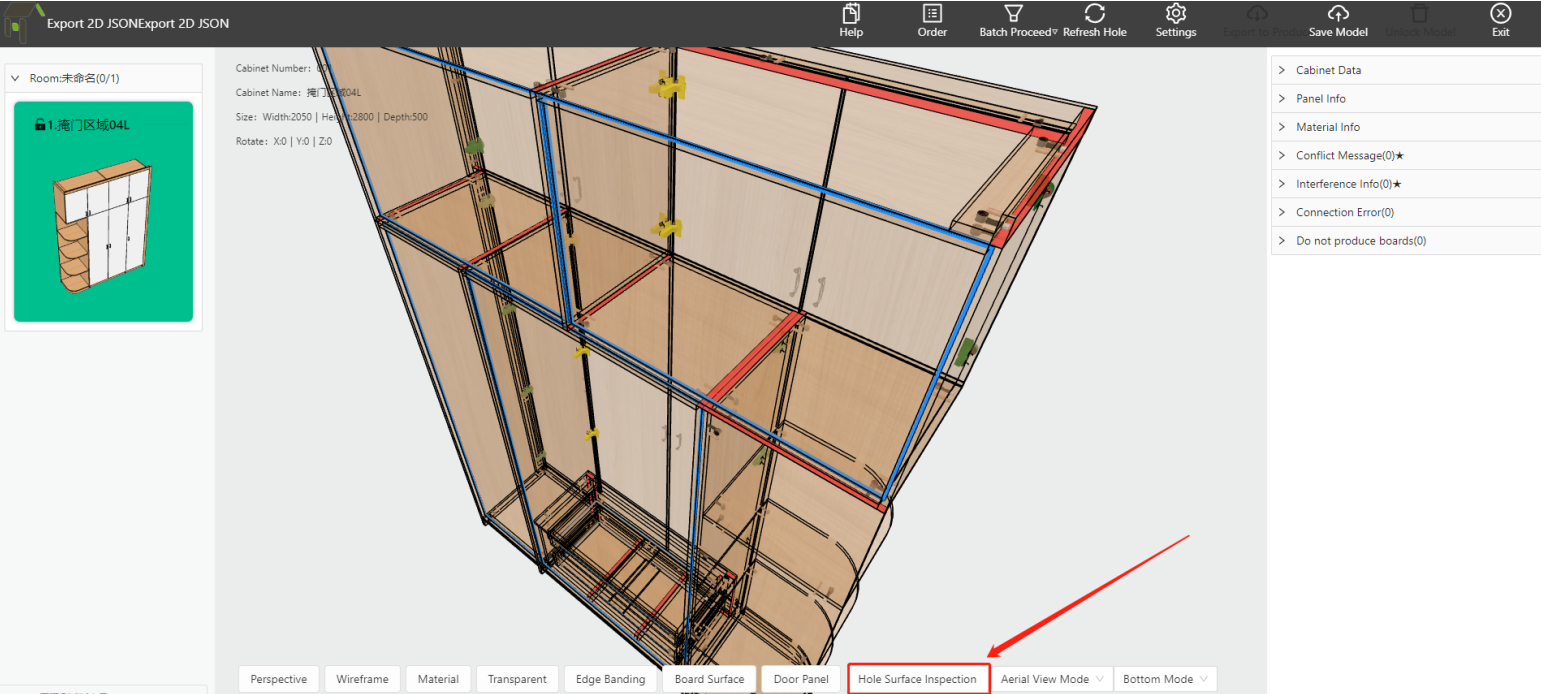
2.5 Hole Surface Detection
In the daily disassembly and review of cabinets, it is generally necessary to check whether the panel has missed holes. You can click on the "Hole Surface Detection" button below the Order Assistant. At this time, when two vertical panels meet the conditions for generating hole positions but there is no hole, they will be highlighted in red. Users only need to check whether holes need to be drilled according to these prompts. If so, they can manually select the connection method.
2.6 Slot Inspection
① When reviewing, if the cabinet is large, we need to check whether a panel's process is correct. However, there are too many panels, so we cannot visually view the details. We can select the panel that needs to be viewed and right-click on 【Slot Inspection】.
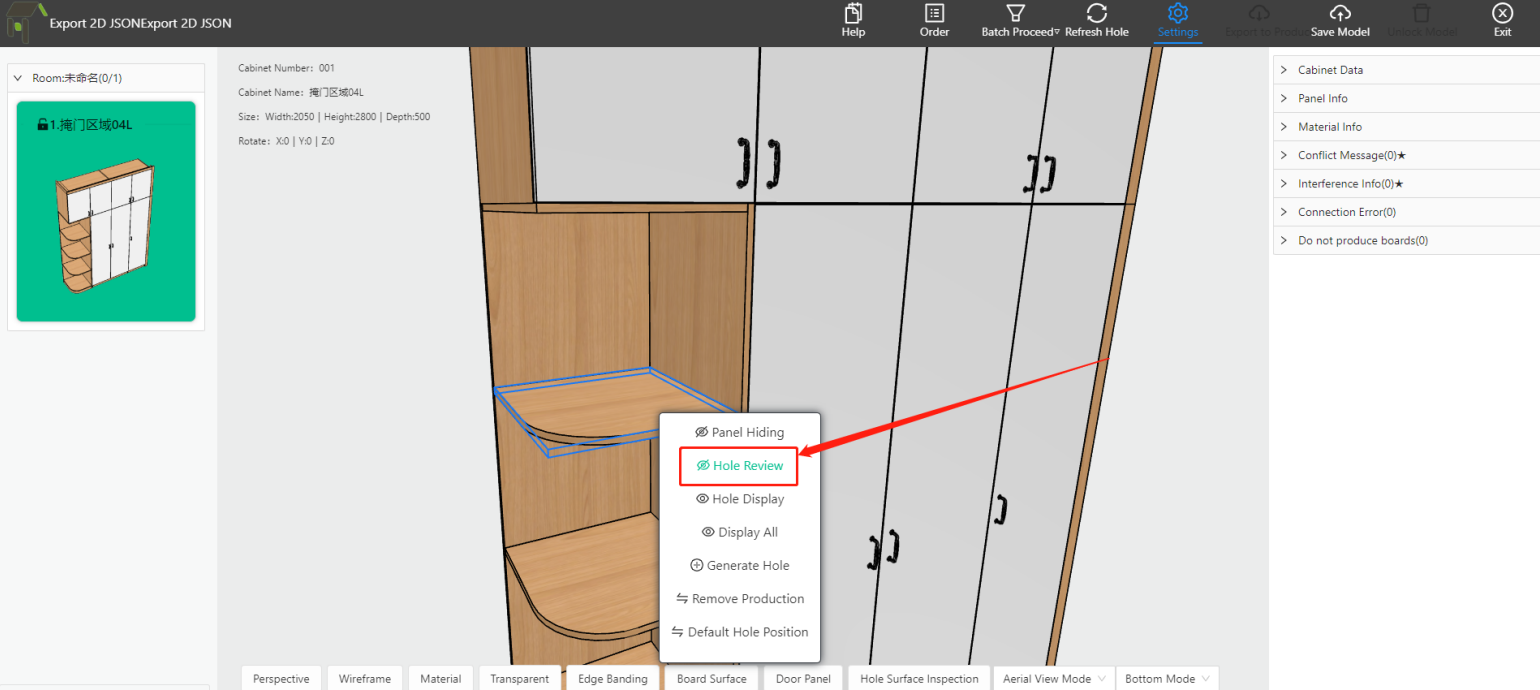
② After selecting 【Slot Inspection】, the system will only display this panel, and the panels related to this panel will be displayed, and other panels will be hidden, which is suitable for visual inspection of the panel process.
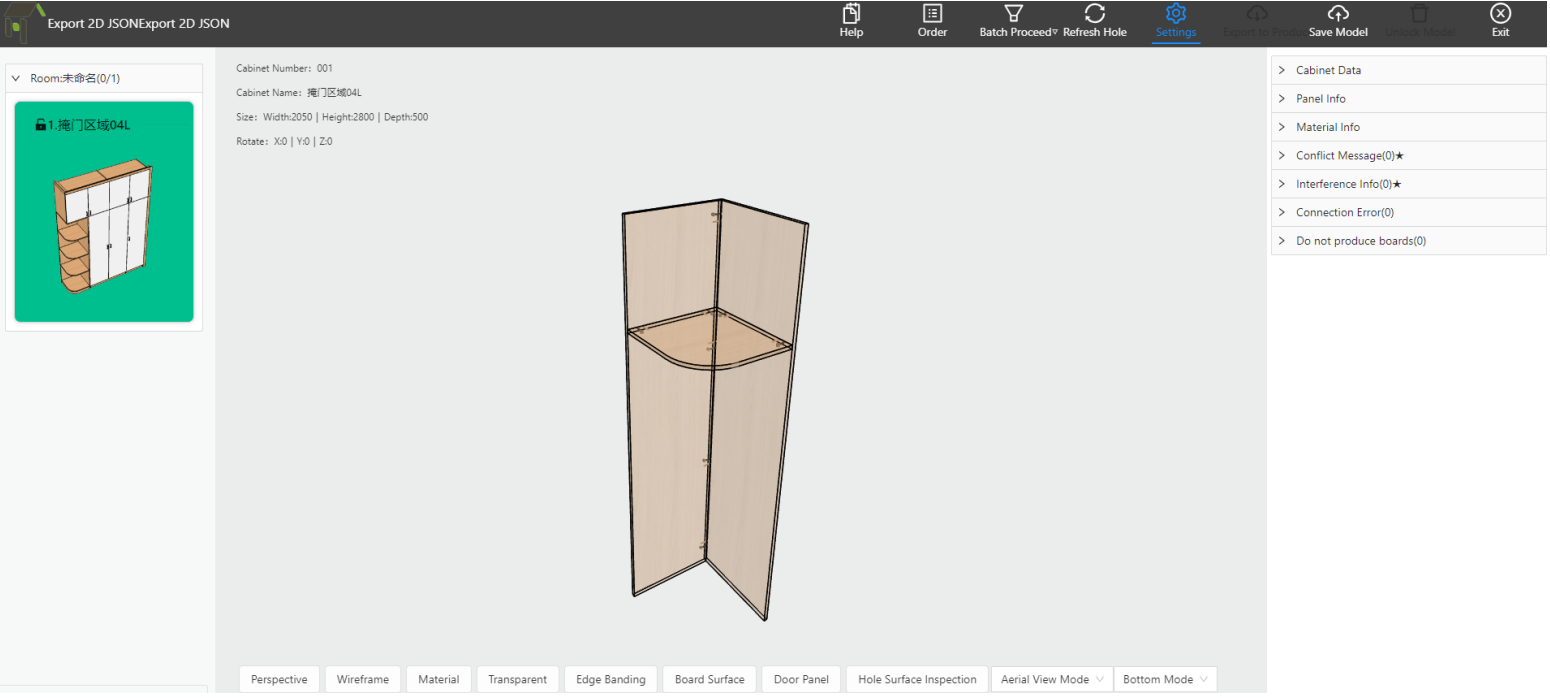
③ To return to all panels, right-click and select 【Show All】.
2.7 Conflict Reminder
Note: The "panel interference" and "connection mismatch" below can be automatically prompted by the system during the generation of Slots and holes. When they appear, we need to find out the reason and resolve it in time.
2.7.1 Conflict Information
Note: Conflict information mainly indicates whether there is a collision between the connected panels in the current cabinet, such as collisions between "through holes, holes and holes, holes and slots". If it is a through-hole collision caused by its own process, it can be ignored. If there is a "hole-hole collision, hole-slot collision", it needs to be checked timely for the solution panel, adjusted according to the actual situation, and modified by contacting the designer if necessary.
Note: This kind of conflict prompt will not occur in normal situations. If it happens, click [Conflict Information] and the panels in conflict will be highlighted in the canvas.
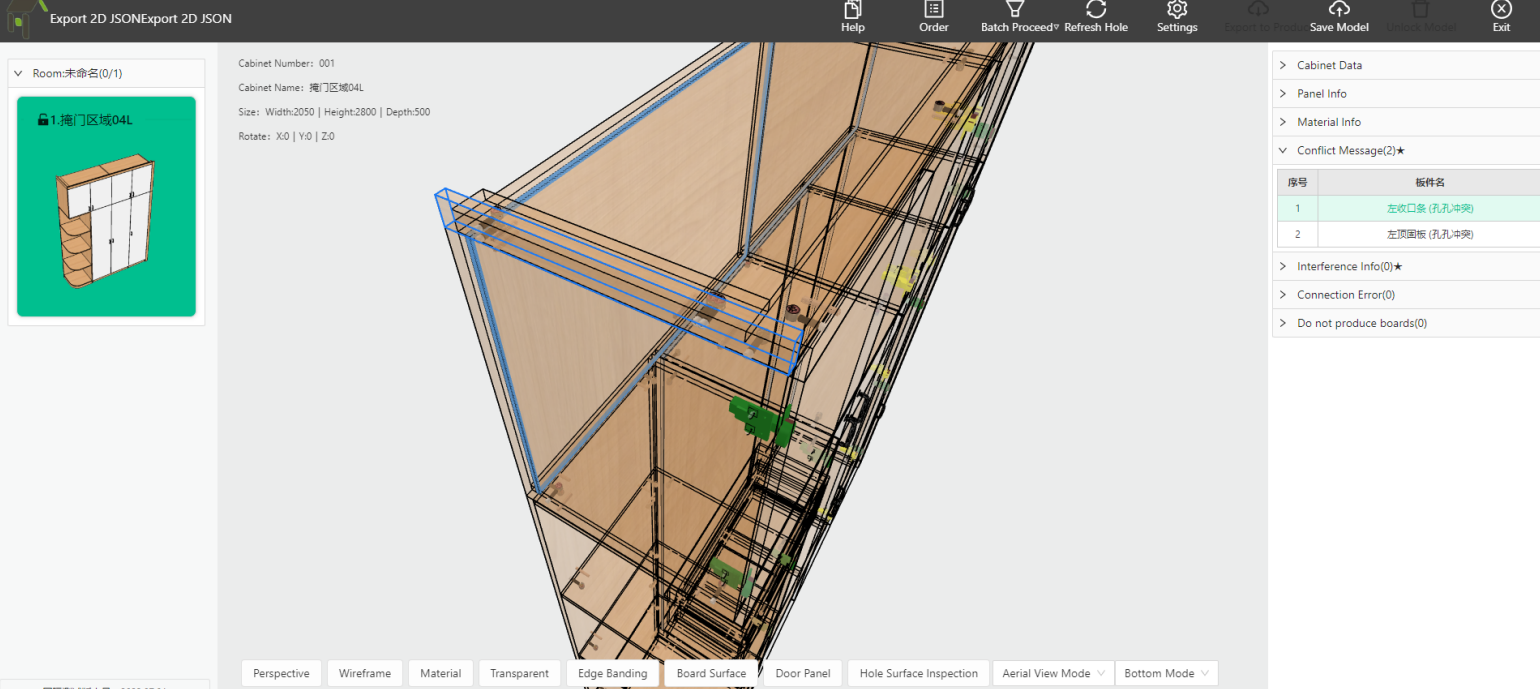
Note: According to the above notes, the right column should be solved according to the situation when such conflicts occur.
2.7.2 Panel Interference
Note: The panel interference function mainly solves the situation where the panels overlap parallel or vertically. It rarely occurs in the small program. It can also be found and changed in the tool interference detection.
① After generating the slot, "Panel interference" is displayed.
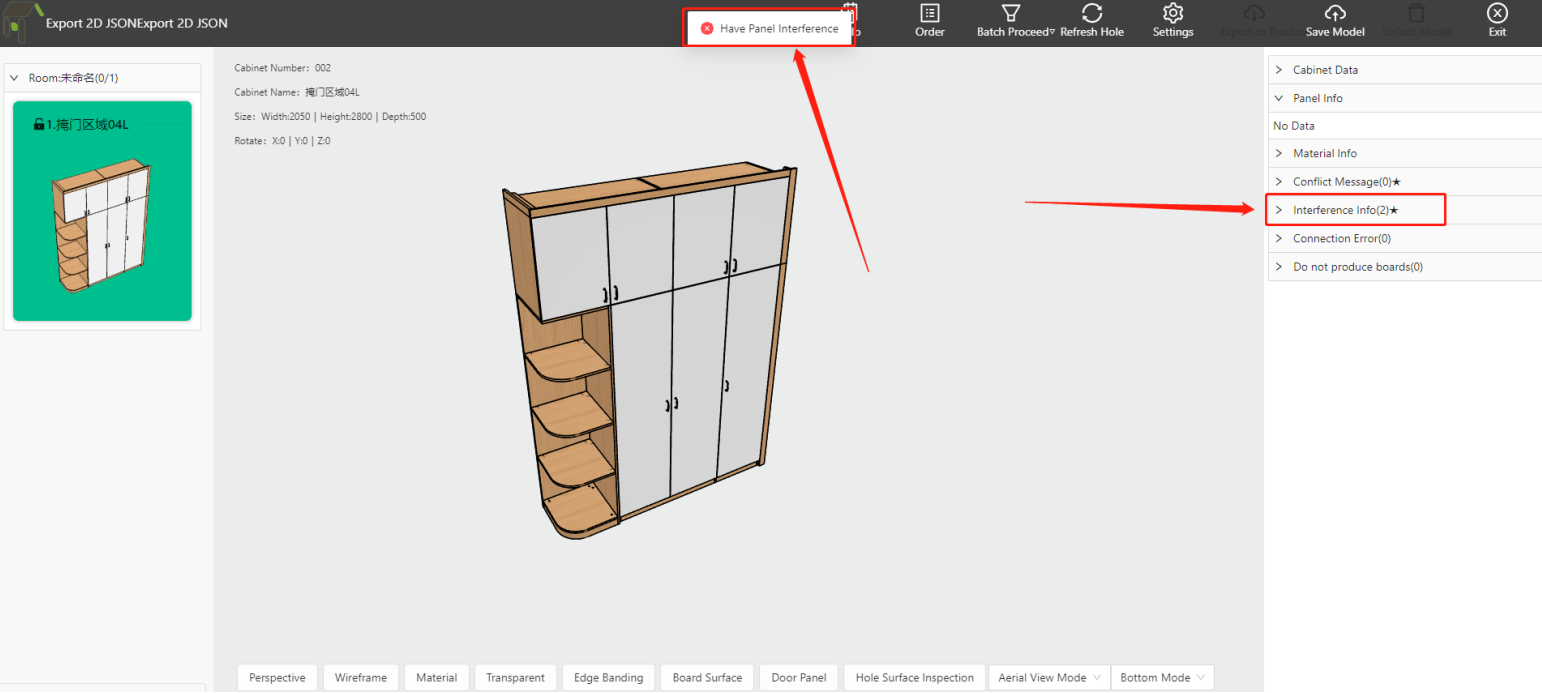
② Click [Panel Interference] on the right side to see which panels have interference.

Note: If there is panel interference in the small program, it is necessary to notify the designer to modify the original plan in time.
2.7.3 Connection Mismatch
When this situation occurs, it means that the connection edge attribute value of a panel in the current cabinet is different from the rules set in the split order, and the configuration settings need to be adjusted to solve the problem.
Tip: When a connection mismatch occurs, contact the responsible person or implementer of the factory to view.
2.8 Not Producing Panels
There are three situations for not producing panels:
2.8.1 Auxiliary Panels Not Produced
In the modeling process, we use auxiliary panels, which are coded as 0202, to assist in punching or slotting, etc., but such panels will not be put into production or list of materials.
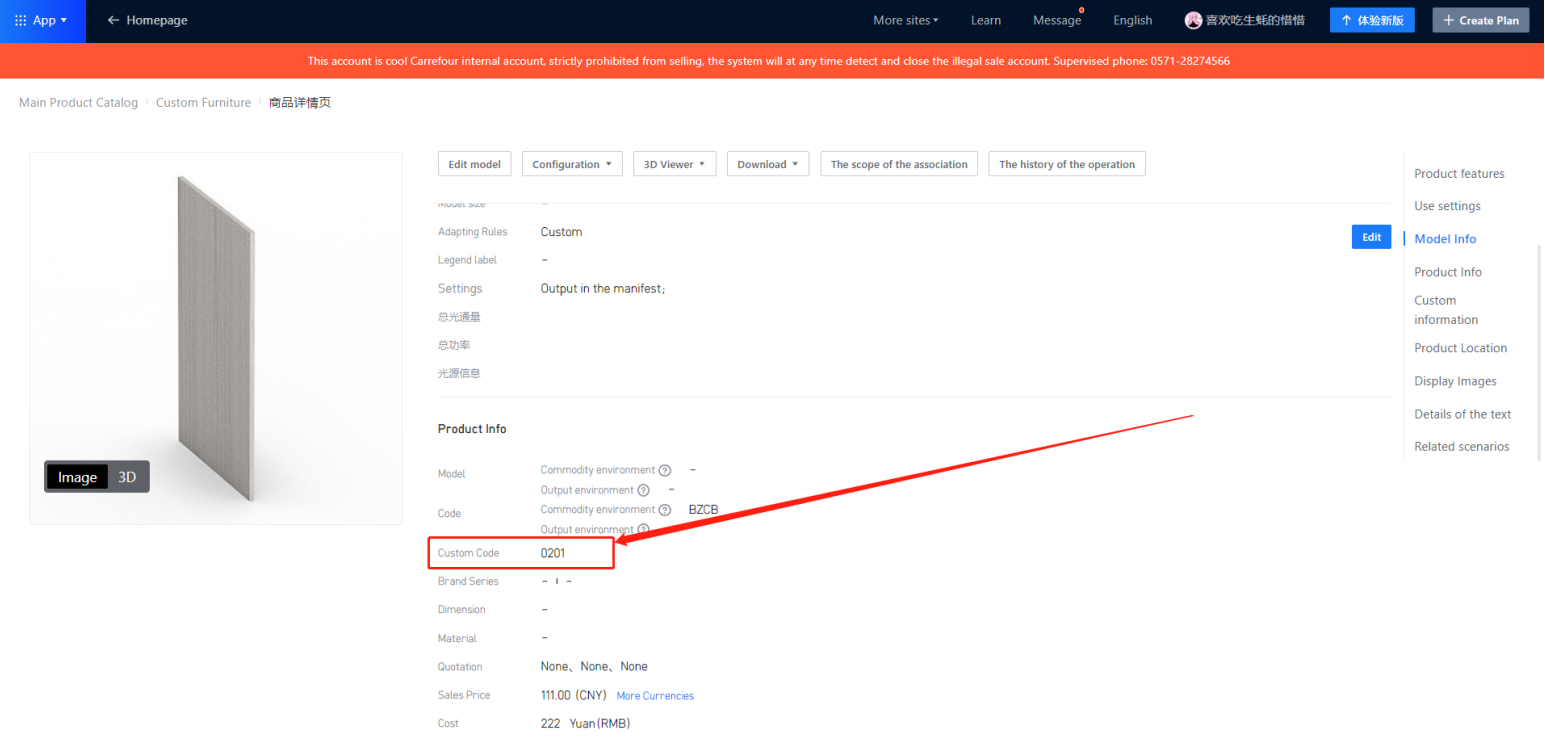
Tip: The system defaults 0202 panels as not output to the standard JSON file, and the system does not prompt for non-production information.
2.8.2 Manually Triggered
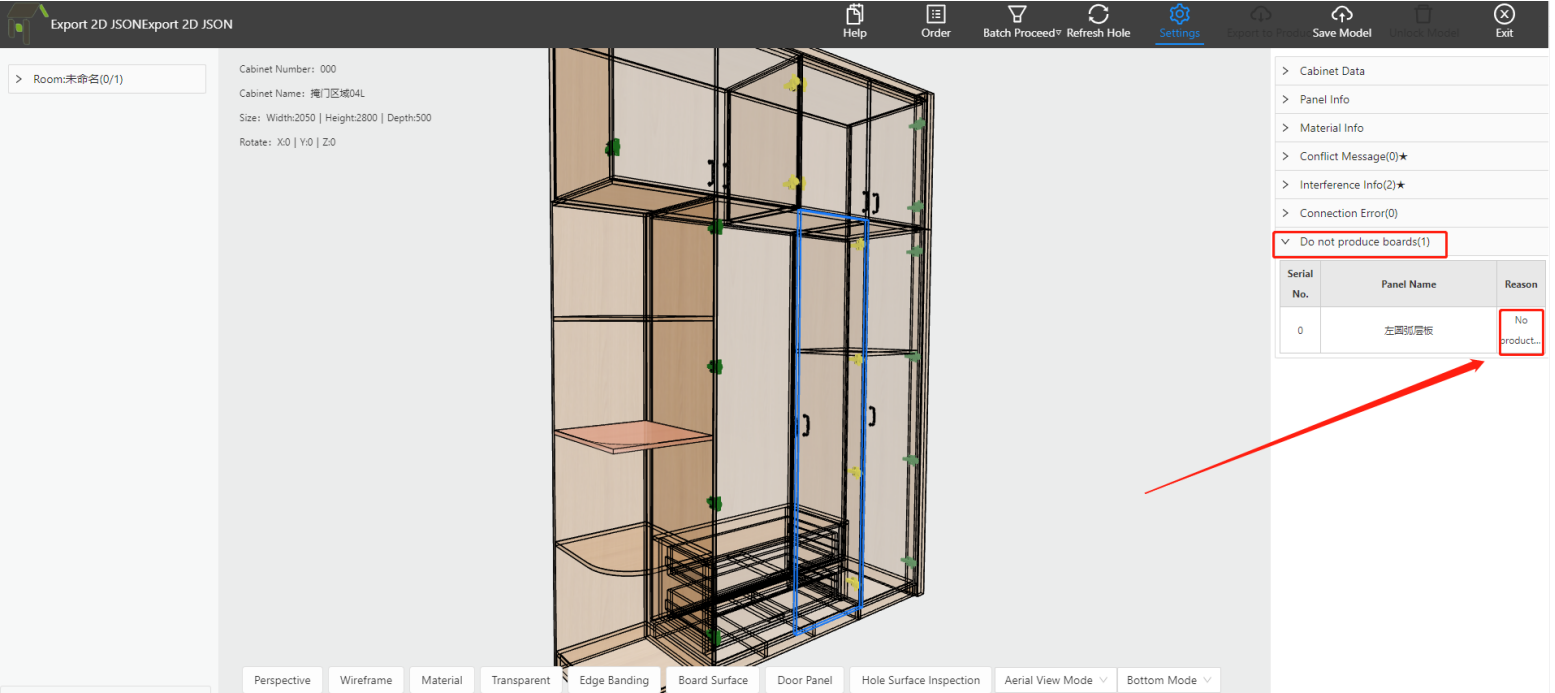
During the split process, when the splitter finds that a panel does not need to be produced, but the code filled in is indeed the production panel code. Then, the splitter can click on this panel, right-click, and click [Remove Production].
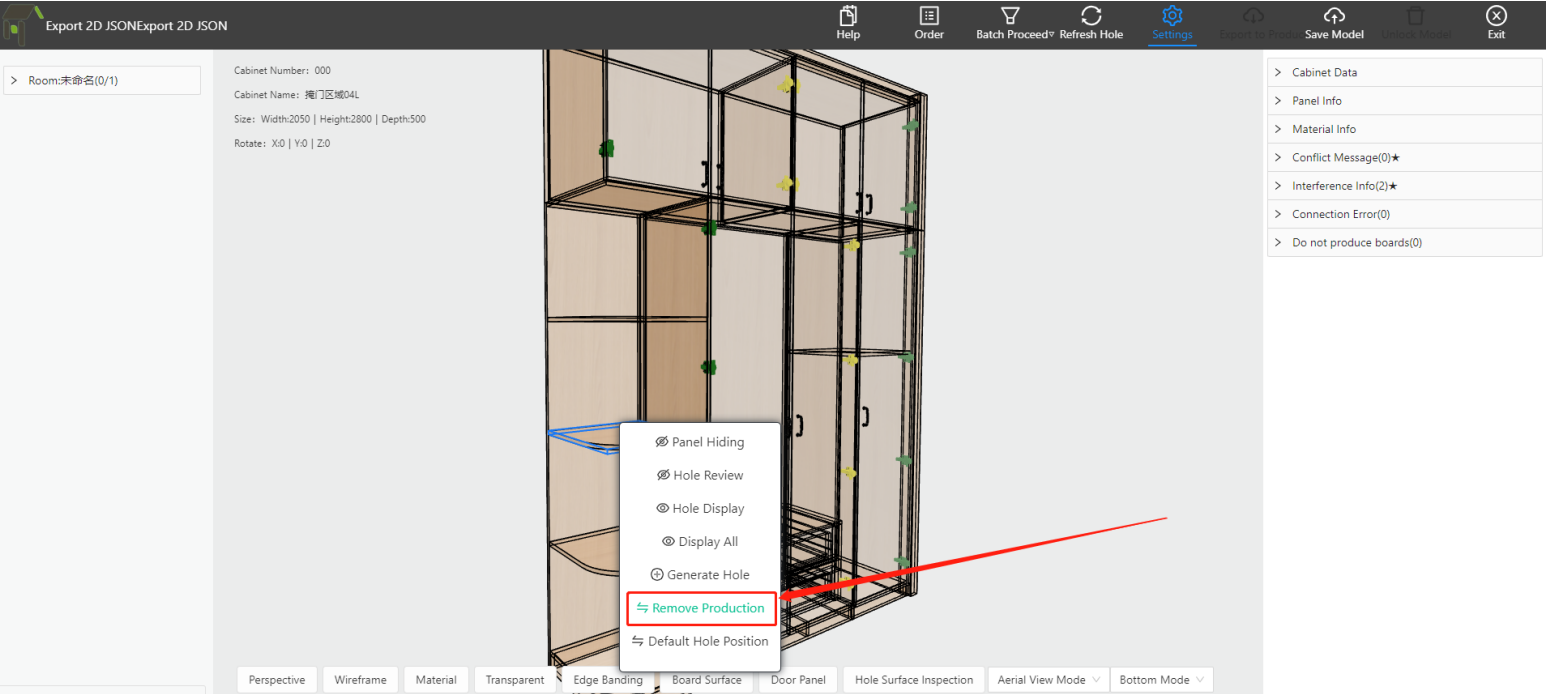
The panel will be removed from production by the system, and it will not be output to the JSON file, and it will also be prompted in the [Not Produced Information] in the right column.
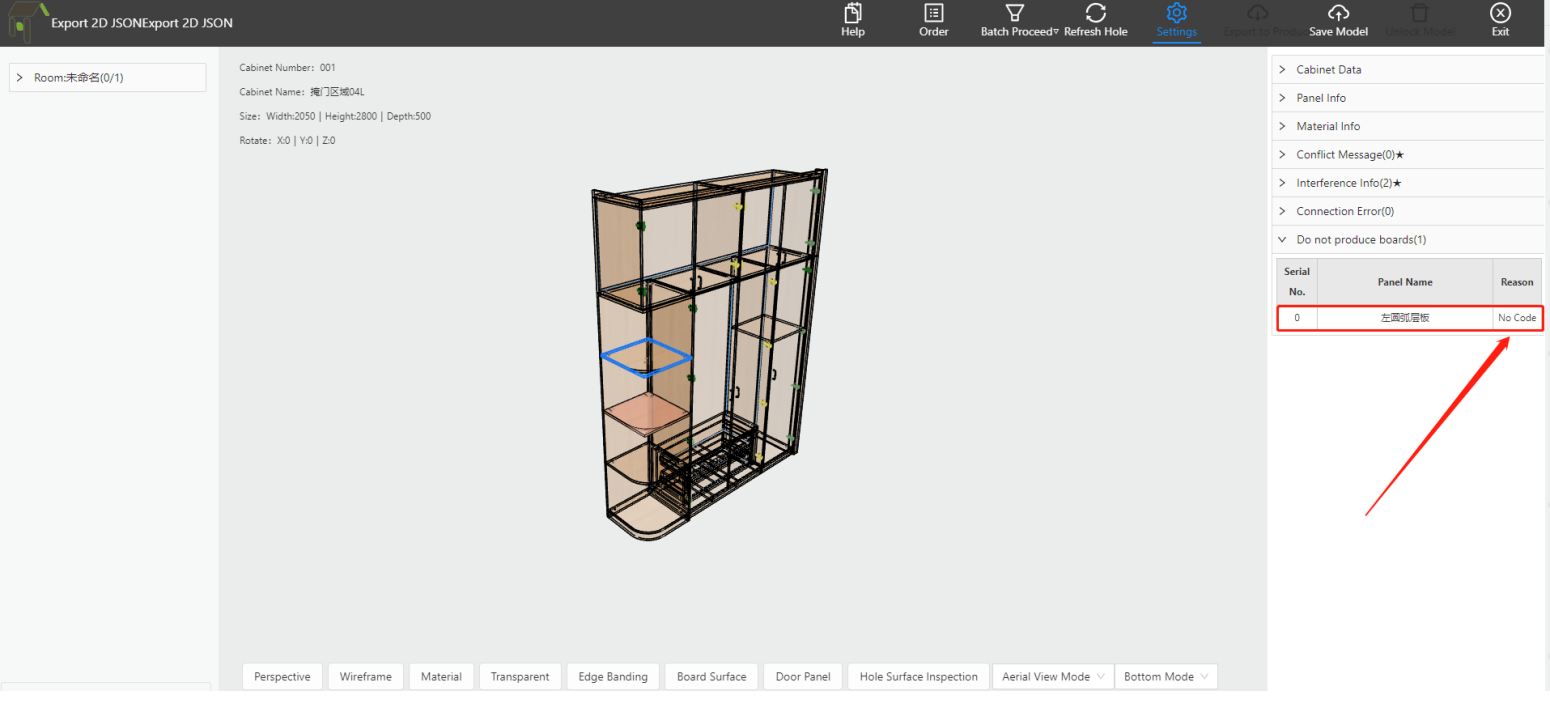
2.8.3 Unfilled Code
In the docking process, specific category codes need to be filled in for the panels to determine their properties. It is possible to miss the code due to human error, which may result in the panel not being output to the JSON file during the split.
① Therefore, the system will also pick out such panels and list them in the "Do Not Produce Panels" in the right column, giving the reason as "no code".
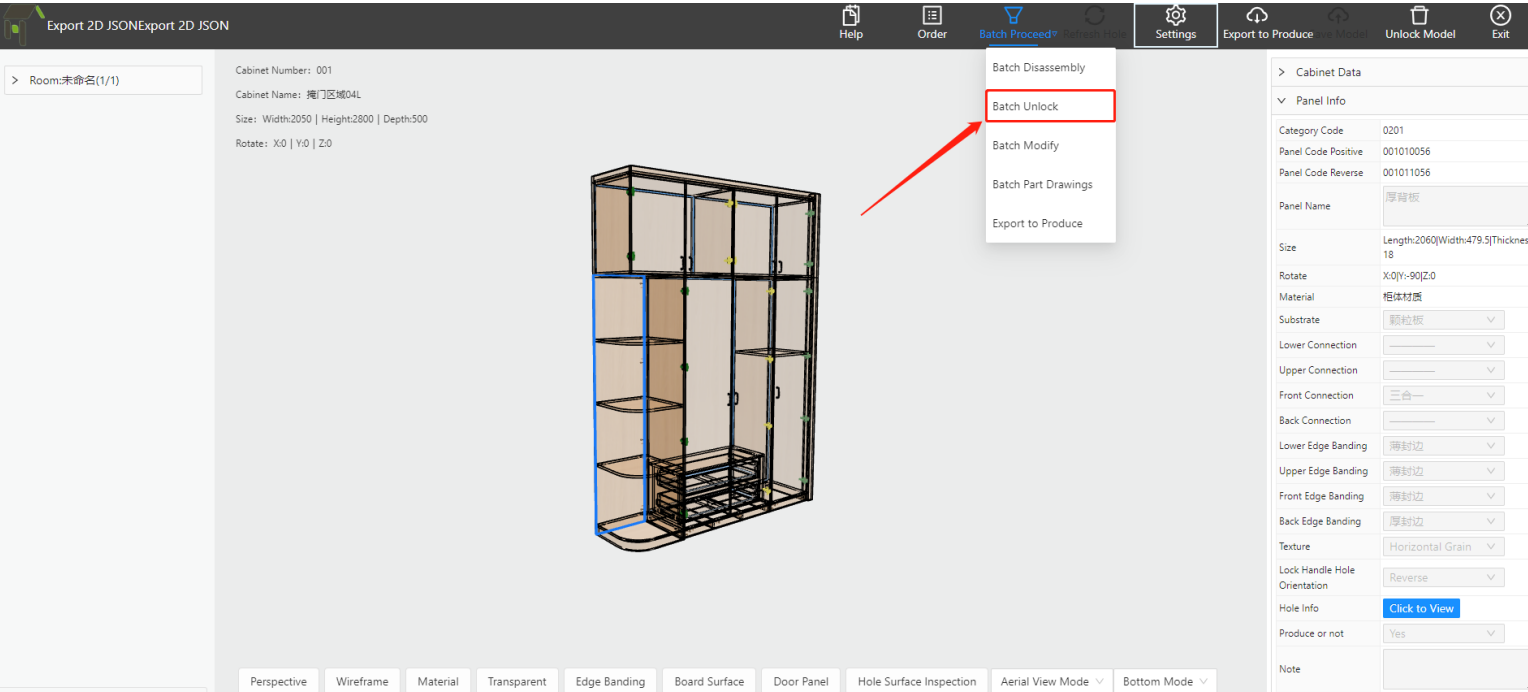
2.9 Saving and Unlocking
During the process of splitting an order, it may happen that a cabinet has been split and saved, but then a problem is discovered that requires adjustments to the parts. In this case, it is necessary to unlock the cabinet in order to make the adjustments, as the cabinet will be locked and cannot be edited otherwise.
① Unlocking a single cabinet
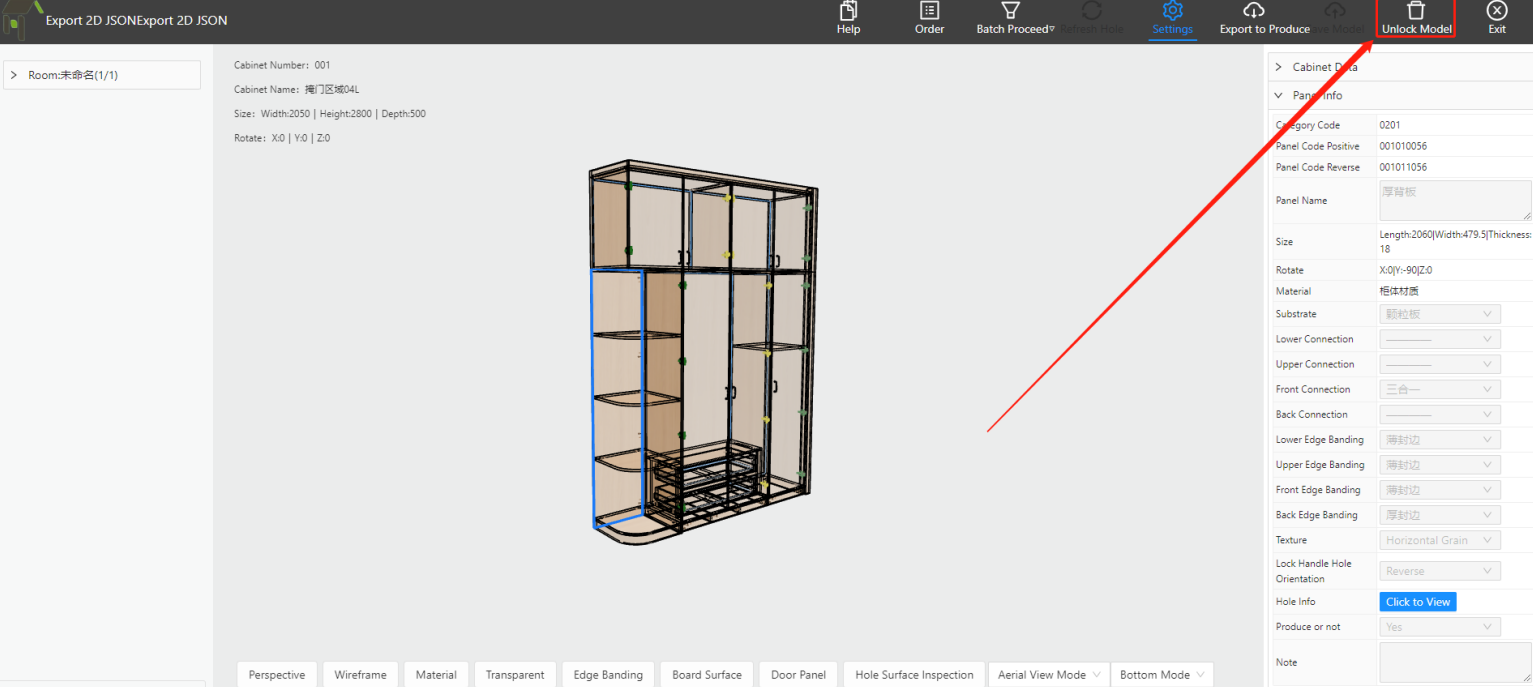
Clicking "Unlock" will unlock the cabinet and make it editable again.
② Batch unlocking
If all cabinets under this order need to be unlocked and resplit, batch unlocking can be used to unlock all cabinets at once.
Process adjustment
3.1 Routine adjustment
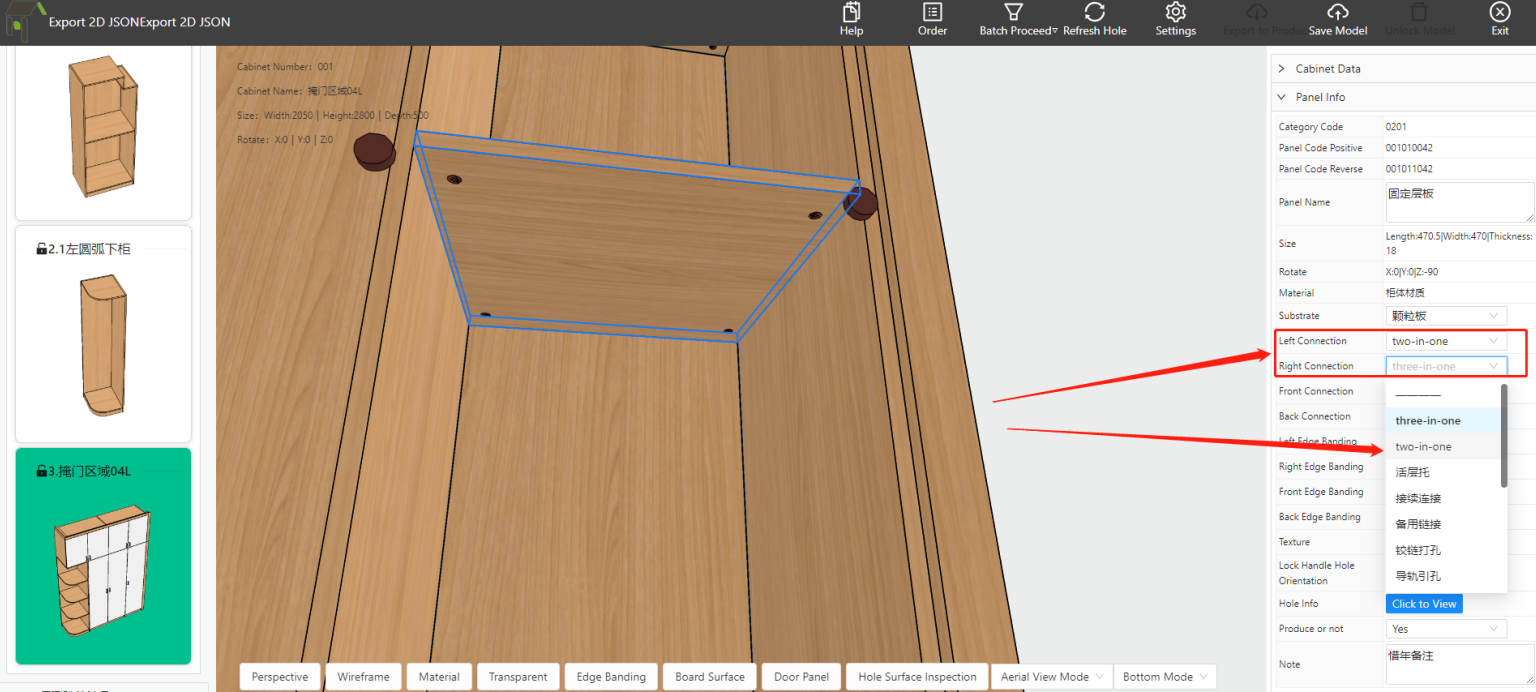
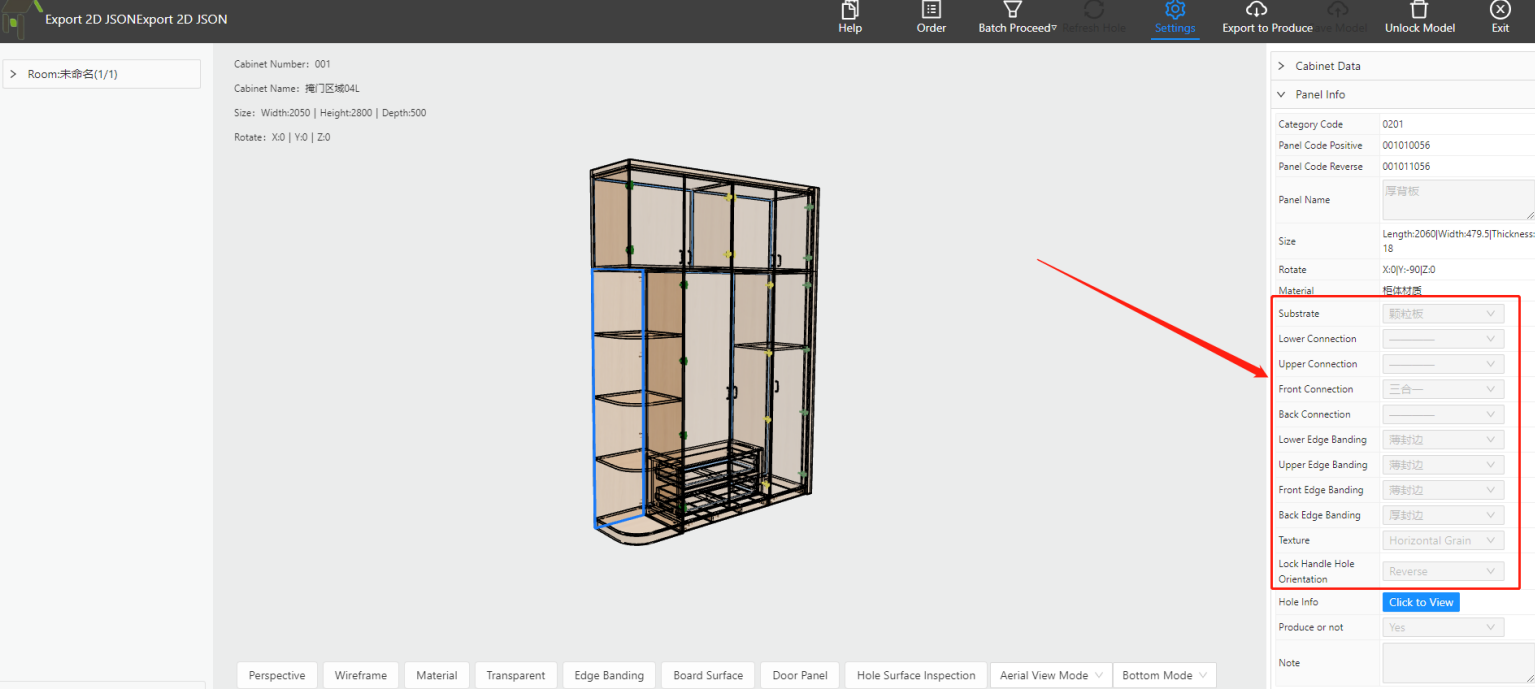
3.1.1 Connection adjustment
Note: During the splitting process, it is often found that the current connection is not suitable for the current part. Therefore, communication with the designer or direct modification of the connection is required.
Example: The layer panel connection in the figure was changed from a three-in-one to a two-in-one panel.
① Click on the part whose connection needs to be modified and modify the connection type in the right sidebar.